Cloud Network

Networking | Support | Tricks | Troubleshoot | Tips

Buymecoffe

Buy Me A Coffee
Showing posts with label Smartphone. Show all posts

Friday, November 8, 2019

Lenovo Launches USB Type-C Power Bank 14,000mAh for Laptops and Smartphone

November 08, 2019
Lenovo Launches USB Type-C Power Bank 14,000mAh for Laptops and Smartphone

Lenovo Launches USB Type-C Power Bank 14,000mAh for Laptops and Smartphone


Lenovo 50W ThinkPlus Power Bank Detailed

Colour 
1. Bright red and Black color 

Models
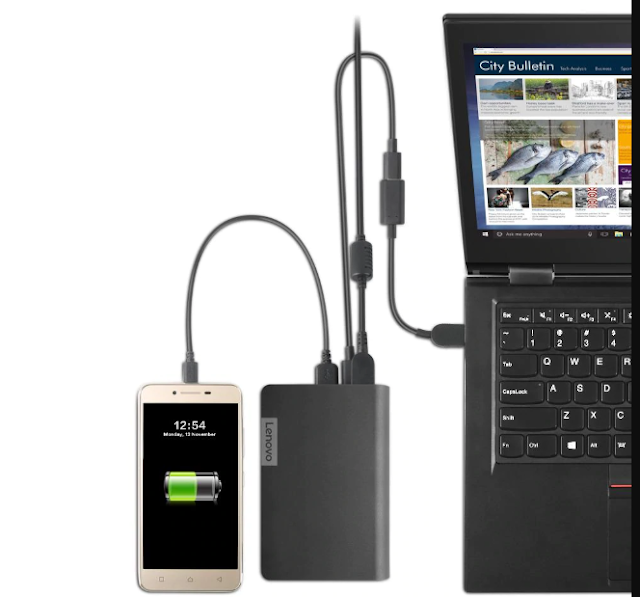
2.  USB Type-C port and  Lenovo’s Slim Tip port

Price
3. Rs 3,050 and Rs 4,050

Battery 
4. 14,000mAh 

Charge 
5. Two Smartphones can charge using USB Type-A port
For Laptop a USB Type-C USB PD 2.0, QC 2.0/3.0, and comes with input and output overvoltage, short circuit and high-temperature protection. 
 
Purchase
OR
Amazon : https://www.amazon.com/Lenovo-USB-C-Laptop-Power-14000mAh-WW/dp/B07D7W5KSQ

Tuesday, October 22, 2019

How Do We Crack a Android Pattern Password

October 22, 2019
How Do We Crack a Android Pattern Password


How do we crack an Android pattern password ?

1.  FIRST METHOD  [ FLASHING ZIP FILE ONLY ]

2.  SECOND METHOD [ USING ADB ]

FIRST METHOD  [ FLASHING ZIP FILE ONLY ]

This is easiest method to crack android pattern lock you have to just flash a small zip file into recovery but in some cases it doesn’t work without root(very rare cases), you must try this once because this is too easy to do. you must have custom recovery installed (like CWM or TWRP) to use this method.

1. First of all download Lockscreen security Bypass.zip file.
http://forum.xda-developers.com/attachment.php?attachmentid=2245081&d=1378720290)

2. Copy the zip file into root folder of your SD card.


3. After copying zip file to SD, boot your phone into Recovery mode(Each phone has different key combination to boot up in recovery mode, find it for your phone).

4. In recovery choose “install zip from SD card or apply update from SD card”, now select “Lockscreen Security bypass.zip” which you have downloaded earlier.

5. After selecting zip file it will start installing when installation is complete, now reboot your device.

6. After rebooting it still demands Password or Gesture, don’t worry give it any password or gesture it will get unlocked Automatic.

SECOND METHOD [ USING ADB ]

Thus process is bit lengthy compared to first method. As usual requirement is also bigger than first method. Rarely root is required in this method.

1.Your device’s driver must be installed on your PC or Laptop.

2.Most important “USB debugging must be enabled on your phone”  without this method will fail!   Download ADB and fastboot files.zip file. (http://www.mediafire.com/download/9ylow29klhccc0x/Fastboot.zip)

3.After downloading extract it on your Desktop(we are going to use these extracted files so it is easy to access them if they are on desktop).

4.Now open the extracted folder (fastboot), here you will find 4 files named as:


5.Now connect your phone to your PC or Laptop.

6.After connecting your mobile press and hold “Shift button” and press right click on empty space, after clicking option will prompted like view,sort by,group by,etc “select open Command window here”.

7.when command prompt open type “adb devices” to check that your device is properly connected or not. If it show some Random numbers in command prompt it means your device is connected otherwise not(the reason behind not connected is that your driver are not successfully installed on your computer).

8.Now there are two methods you should check both of them look which will work for you.

a).Type the following command into command prompt.
adb shell cd /data/data/com.android.providers.settings/databases sqlite3 settings.db update system set value=0 where name='lock_pattern_autolock'; update system set value=0 where name='lockscreen.lockedoutpermanently'; .quit

b).If the above code does not work type this one into command prompt.
adb shell rm /data/system/gesture.key


Monday, October 21, 2019

How to Root Any Android Smartphone

October 21, 2019
How to Root Any Android Smartphone


How to Root Any Device

How to Root any Android Device

For those new to the world of rooting, acquiring root access essentially grants you elevated permissions.

With root access, you are able to access and modify files that would normally be inaccessible, such as files stored on the /data and /system partitions.

Having root access also allows you to run an entirely different class of third-party applications and apply deep, system-level modifications.

And by proxy, you may also be able to access certain device features that would otherwise be inaccessible or use existing features in new ways.

Remember, Rooting will void your warranty. So If you are on warranty period, Don't do it!

Due to its inherent power, having root access is often dangerous.

Thankfully, there are root brokering applications such as SuperSU that only grant root access to applications of your choosing.

There are also various root-enabled utilities available to help you restore in the event that something goes wrong.

For starters, you can use any number of root-enabled application backup tools to backup your applications and their data to your local storage, your PC, and even online cloud storage.

And in conjunction with a custom recovery, rooted users are able to perform a full, system-wide Nandroid backup that essentially takes a snapshot of your current smartphone or tablet at any particular time.


SAMSUNG
HTC
GOOGLE
MOTOROLA
SONY
LG
OPPO
ONEPLUS
AMAZON
OTHERS

Framaroot

Many devices can be rooted

KingRoot

KingRoot is root for people who just want to have root access to their devices, and not necessarily wanting to flash anything extra. It works on almost all devices from Android version 2.x to 5.0. Working of KingRoot is based on system exploit. The most suitable root strategy will be deployed from cloud to your device according to the ROM information on the device. The best part of using this root method is that it does not trip KNOX and have the ability to close Sony_RIC perfectly.

Samsung

Galaxy Ace
Galaxy S Advance
Galaxy S Relay
Galaxy W
Galaxy Y
Galaxy Y Duos 
Galaxy Nexus
Galaxy S II 
Galaxy SII Plus 
Galaxy S III 
Galaxy S4
Galaxy S4 Active
Galaxy S5 
Galaxy S6


Key Combinations :-

Download: Home + Volume(-) + Power
Recovery: Home + Power

How to install Stock Firmware ?

Be Careful while Flashing via Odin!

1).    Do not turnoff / Remove USB Cable while flashing.
2).    Flash Correct Firmware File; otherwise your device may become HARD BRICK means DEAD!
3).    Read Flashing Instructions Carefully.

What do u need?

1.    A PC or Laptop with Windows Operating System.
2.    Usb Cable for Galaxy Ace.
3.    Odin Multi Downloader. Odin for GT-S5830+OPS.zip (Dev-Host, 462 KB)
4.    Cooper.ops file for Odin
5.    Stock Firmware for your region. (Our device is GT-S5830)
6.    Firmware archive for GT-S5830
7.    Or Get it from this website. (http://www.tsar3000.com)
8.    Samsung Drivers for PC. (Setup for Compiled Driver Disk (Samsung).exe (Dev-Host, 12.5 MB))

Step-by-Step Instuctions :-

1.    Install Samsung Drivers.
2.   Extract Stock firmware zip file to get the .tar.md5 file named like "S5830XWKTM........"
3.   Extract "Odin for GT-S5830+OPS.zip" with WinRar, 7Zip or Windows zip file utility.
4.  Power off your Phone.
5.    Get into "Download mode" by pressing Home + Vol(-) + Power Keys.
6.   Open Odin_Multi_Downloader.exe
7.  Connect your phone to pc via USB cable.

Make sure that your phone is detected in "Com Port Maping" area (YELLOW Color)
  
Step:1 - Press "Select Ops" button and choose Cooper.ops file along with the Odin_Multi_Downloader.exe
Step:2 - Check "One Package" tick.
Step:3 - Press "One Package" button and choose the firmware file xxxx.tar.md5
Step:4 - Press "Start" button under Execution.


Wait for some time... The flashing may take about 4 min - 5 min. The Phone will be auto rebooted after successfull flasing.
    Remove the USB Cable.
    If you are facing boot loop after flashing completed on
Odin, you have to go to Stock Recovery (Home+Power Key
combination) and select wipe data/factory reset.

How to install ClockworkMod Recovery?

1.    Download and Copy CWM 5.0.2.6-Cooper.zip (Dev-Host, 5.42 MB) to SD Card
2.   Power off your Galaxy Ace
3.    Get into recovery mode by pressing Home+Power Keys.
4.   Choose "apply update from sdcard"
5.    Select "CWM 5.0.2.6-Cooper.zip" and confirm the action.
6.   Reboot system now
7.    Again go to recovery mode by pressing Home+Power Keys.
8.   Now you are successfully installed CWM!

Note :-  Use App Master Tool from Play Store to Remove system apps, (Be carefull while selecting system apps. Some apps are essential for the system, double check before removing them)

Use Root Browser Free or Rhythm File Manager for best root file access.

Galaxy S6 Edge 
Galaxy S6 Edge+
Galaxy Note 
Galaxy Note 2 
Galaxy Note 3 
Galaxy Note 4 
Galaxy Note 5 
Galaxy Note Edge
Galaxy Note Pro 12.2
Galaxy Gear
Gear 2
Gear 2 Neo
Tab Pro (12.2, 10.1, 8.4)
Tab S (8.4 | 10.5)
Tab S2
Tab 3
Tab 4


HTC
HTC Butterfly
HTC Desire
HTC Desire 500
HTC Desire 610
HTC Desire 816
HTC Desire X
HTC Desire Z
HTC Desire HD
HTC Desire Eye
HTC Evo 3D
HTC Flyer/Evo View 4G
HTC Incredible
HTC Incredible S
HTC One S
HTC One V
HTC One X | One X+
HTC Sensation
HTC One M7 
HTC One Mini
HTC One Max
HTC One M8 
HTC One M9
HTC One A9

Google
Chromecast
Nexus One
Nexus 4
Nexus 5
Nexus 5X
Nexus 6
Nexus 6P
Nexus 7 (Tablet)
Nexus 9 (Tablet)
Nexus 10 (Tablet)
Nexus Player

Pixel C

Motorola
Moto E
Moto E (2015)
Moto G
Moto G (2014)
Moto G (2015)
Moto X
Moto X (2014)
Moto X Play
Moto X Style Pure
Droid X (MB810)
Droid X2 (MB870)
Droid 3 (XT862)
Droid 4 (XT894)
Droid Razr
Droid Razr HD

Sony

Xperia Line (Cross Development) (Link 1 | Link 2)
Xperia T/V/TX
Xperia Z (For FW 10.3.1.A.0.244)
Xperia Z Ultra
Xperia Z Ultra GPe
Xperia Z1
Xperia Z2
Xperia Z3
Xperia Z5
Xperia Z5 Premium
Xperia Z2 (Tablet)
Xperia Z1 Compact - Xperia U
Xperia Z3 Compact   - Xperia SP 
Xperia Z5 Compact   - Xperia S

LG


G Flex
G2 
G2 Mini
G3 
G4
Pro 2
Lucid 2
G-Flex 2
G Watch
G Watch R

Oppo
N1
N3
R819
Find 5
Find 7 | 7a

OnePlus
OnePlus One
OnePlus Two
OnePlus X

Amazon
Kindle Fire 1 (original)
Kindle Fire 2

Others

Elephone Vowney
XIAOMI Redmi 1S
XIAOMI Mi Note Pro
XIAOMI Mi 4C
ZTE Blade
Nvidia Tegra Note 7
HP Slate 7 (2800)
NVidia Shield Tablet
Dell Venue / Acer Iconia A1-830
Asus Zenfone 2
Asus Zenfone 5
Nokia X2
Alcatel OneTouch Idol 3
ZTE Axon Elite