Cloud Network

Networking | Support | Tricks | Troubleshoot | Tips

Buymecoffe

Buy Me A Coffee

Wednesday, August 20, 2014

How to Fix "Unable to Resolve HostName" in Ubuntu 14.04

August 20, 2014
How to Fix "Unable to Resolve HostName" in Ubuntu 14.04
Error :- unable to resolve host Ubuntu 12.04 / 12.10 / 13.04 / 14.04

Open the Terminal and Type
Step1 :- cat /etc/hosts      ----  To Check Hostname
Step2 :- cat /etc/hostname   ----  To Check Hostname          
Both host name should be Same in hosts and hostname file ....if not means see next step3.
Hosts File in Linux

Step3:- Open hosts and hostname both Should be Remove (cloud or any name if there. See Below Images) 
Step4 :- Save and Exit by (press ctrl+x) then pres (yes) 
/etc/hosts 
Step5:- cat /etc/hosts  
hostname in ubuntu

cat /etc/hostname and cat /etc/hosts both Name should be Match.


Thanking You
Hope U Like It............

Windows Server 2008

Orientdb NoSQL part2

Python 3.4.1

Install OrientDB Document Graph

Netbeans IDE
Vtiger CRM Database

How to Install & Setup Nagios Core 4.0.7 Network Monitoring Tool in Ubuntu 14.04 Server

August 20, 2014
How to Install & Setup Nagios Core 4.0.7 Network Monitoring Tool in Ubuntu 14.04 Server
How to Install & Setup Nagios Core 4.0.7
Hello Everyone,

In this tutorial, let us Install Nagios

How to Install Nagios Core 4.0.7 and Nagios Plugins 2.0.3 Latest Version in Ubuntu 14.04 Server.

1. Software Required
Nagios 4.0.7.tar.gz
Nagios plugins 2.0.3.tar.gz

2. You Need to Login With Root to Perform all Command
Step1 :- sudo su

3. Installed packages
Step2 :- sudo apt-get install apache2 build-essential daemon libapache2-mod-php5 libgd2-xpm libgd2-xpm-dev php5-gd unzip wget sendmail

4. Installation Part
Update ubuntu repositories by giving the below command
Step3 :- sudo apt-get update
Step4 :- sudo apt-get upgrade

5. Install package
Step5:- sudo apt-get install apache2 php
Step6:- sudo apt-get install gcc glibc-common
Step7:- sudo apt-get install gd gd-devel

6. Create Nagios User,  Group and Password
Step8:-  useradd nagios  or    /usr/sbin/useradd -m nagios
Step9:-   passwd nagios
Step10:-  groupadd nagcmd  or   /usr/sbin/groupadd nagcmd
Step11:-  usermod -G nagcmd nagios
            usermod -G nagcmd apache    or  /usr/sbin/usermod -a -G nagcmd nagios

7. Download Nagios Core 4.0.7 and Nagios Plugin 2.0.3
Step12:-  mkdir /root/nagios
Step13 :-  cd /root/nagios

Step14:- sudo wget http://prdownloads.sourceforge.net/sourceforge/nagios/nagios-4.0.7.tar.gz
Step15:- sudo wget https://www.nagios-plugins.org/download/nagios-plugins-1.5.tar.gz
                OR DIRECT D/L LINK
http://www.nagios.org/download/core

8. Unzip the download nagios
Step13:- tar xvf nagios-4.0.7.tar.gz

Step:- ll (two new folders will appear in that directory)

Step14:- cd nagios-4.0.7.tar.gz
Step15:-   ./configure  --with-command-group=nagios--with-command-group=nagcmd --with-mail=/usr/bin/sendmail
Step16:- make all
Step17:- make install
Step18:- make install-init     ----  scripts
Step19:- make install-config   ----  configuration file
Step20:- make install-commandmode  ----  external dir command
Step21:- make install-webconf      ----  apache and nagiso config file install

1. In this step, we will be creating a password for “nagiosadmin"
2. Keep it remember because this password will be used when you login in the Nagios Web interface.

Step:-  htpasswd -s -c /usr/local/nagios/etc/htpasswd.users nagiosadmin

9. Customizing Nagios Configuration
Step22 :-  vi /usr/local/nagios/etc/objects/contacts.cfg

11. Unzip the download nagios
Step25:- cd /home/download  or cd /root/nagios
Step26:- tar xvf nagios-2.03.tar.gz
Step27:- cd nagios-2.0.3.tar.gz
Step28:-   ./configure --with-nagios-user=nagios --with-nagios-group=nagios
Step29:- make all
Step30:- make install

12. Copy and link Nagios Apache configuration
Step31:- sudo cp /etc/apache2/conf.d/nagios.conf /etc/apache2/sites-available/nagios
Step32:- sudo ln -s /etc/apache2/sites-available/nagios /etc/apache2/sites-enabled/nagios

14. Check Nagios configuration for errors
Step33:- sudo /usr/local/nagios/bin/nagios -v /usr/local/nagios/etc/nagios.cfg

15. Make Nagios and Apache start at boot
Step34:- sudo ln -s /etc/init.d/nagios /etc/rcS.d/S98nagios
Step35:- sudo ln -s /etc/init.d/apache2 /etc/rcS.d/S99apache2
Step36:- chkconfig -add nagios
Step37:- chkconfig nagios on

16. Start Nagios Core 4.0.7 Service
step38 :- sudo service nagios start

17. Start Apache Service
step39 :- sudo service apache2 start

                  TESTING TIME

 Visit Nagios URL in your browser
http://IPADDRESS/nagios  or http://domainname.cm/nagios
username:- nagiosadmin and password:- created in step 8

18. To Add New User & Reset Password
The user's credentials password are stored in
     /etc/nagios3/htpasswd.users

19. To change the nagiosadmin password.
step43:- sudo htpasswd /etc/nagios3/htpasswd.users nagiosadmin

 20. To add a user
step44:- sudo htpasswd /etc/nagios3/htpasswd.users steve

                 ERROR
Error 1 after login :-  error could not read object configuration data nagios 4 run nagios as daemon.

Step40:- sudo /usr/local/nagios/bin/nagios -d /usr/local/nagios/etc/nagios.cfg

Error 1 after login:-  It appears as though you do not have permission to view information for any of the hosts you requested.

Step41:- sudo nano /usr/local/nagios/etc/cgi.cfg
Step42:- sudo service nagios restart

NOTE :- For Any Clarification Please Comment Below

Thanking You
Hope U Like it........

Own Website

Vtiger Open Source

Install Vtiger CRM

Tortoise installation SVN

Notepad++ install
Ubuntu Server 12.04

Thursday, August 14, 2014

How to Install Red Hat Enterprise Linux Server 7 on Virtual Box with Full Screen Resolution

August 14, 2014
How to Install Red Hat Enterprise Linux Server 7 on Virtual Box with Full Screen Resolution


Hello Everyone,

In this tutorial,

Let us Install RED HAT ENTERPRISE LINUX SERVER 7 on Virtual Box with Full Screen Resolution   --  64 Bit

You Can also Install in VMware Workstation 11 or Microsoft Hyper-V.

Minimum System Requirements
1.  x86-64 CPU (64-bit Macs, with an Intel Core 2 Duo, Intel Core i3, Intel Core i5, Intel Core i7, or Xeon processor).
2GB of System Memory (RAM).
3. 20GB of Disk Space(Hard Disk).
4. Graphics Card and Display capable of at least 1024x768.
5. Either a CD/DVD drive or a USB port for the installer media.
6. Internet Access.

Step1:- First Download Virtual box setup below is this link to download 
Or
Another Link to Download Virtual Box

Select -- Virtual Box 4.3.X for Windows hosts 32 or 64 bit.   
(Where 'X' is the Latest Version)

Step2:- See My Video How to Install virtual box... Click Below link

Step3:- Download ISO Image Redhat Linux Server 64 bit.....Click Below link

For Full Screen Resolution..
Step4 :- sudo apt-get install virtualbox-guest-dkms virtualbox-guest-utils virtualbox-guest-x11                or
Step5 :- sudo apt-get install virtualbox-guest-dkms
Restart the VM and enjoy screen-size.

Mount the Guest Additions by selecting Devices --- Insert Guest Additions CD image… (or you can press Host + D)
Step6 :- run the VBoxLinuxAdditions.run script within the newly mounted cd
              or  sh VBoxLinuxAdditions.sh

Watch the Video on How to Reset Root Password in Redhat Linux 6 or 7.

NOTE :- For Any Clarification Please Below

Comment,
Like and
Share  us  and  help us to spread.

####--------------------------------------------------------------------------------------####
Website    :-   http://www.cloudnetwork.in
Twitter     :-   http://twitter.com/itcloudnet
Skype Id  :-   cloud.network1
E-Mail Id :-   itcloudnet@gmail.com
####----------------------------------------------------------------------------------------####                         
Thanking You
Hope U Like it........

Tuesday, August 12, 2014

How to Remove "Duplicate Sources List" in Ubuntu 14.04/14.10/15.04 LTS

August 12, 2014
How to Remove "Duplicate Sources List" in Ubuntu 14.04/14.10/15.04 LTS
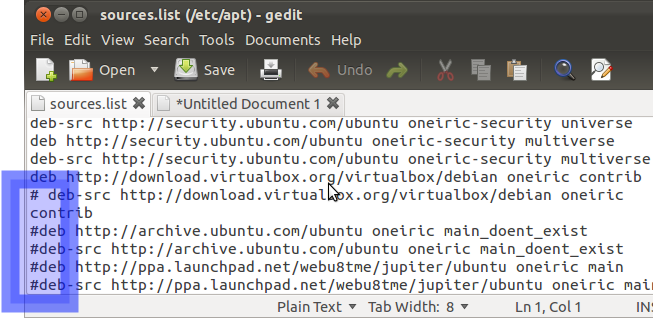
Duplicate Sources ListError :- W: Duplicate sources.list entry http://download.virtualbox.org/virtualbox/debian/ precise/contrib i386 Packages (/var/lib/apt/lists/download.virtualbox.org_virtualbox_debian_dists_precise_contrib_binary-i386_Packages)

Solution
Open Terminal Type
Step1:- su (logging into Root) 

Step2:- sudo gedit /etc/sources.list

Step3:- Remove the Virtualbox in Red Colour as Shown Below Image   
Step4:- Save it and Exit.   
See http://help.ubuntu.com/community/UpgradeNotes for how to upgrade to
# newer versions of the distribution.
deb http://us.archive.ubuntu.com/ubuntu/ precise main restricted
#Addedby software-properties
deb-src http://us.archive.ubuntu.com/ubuntu/ precise restricted main multiverse universe

## Major bug fix updates produced after the final release of the
## distribution.
deb http://us.archive.ubuntu.com/ubuntu/ precise-updates main restricted
#Addedby software-properties
deb-src http://us.archive.ubuntu.com/ubuntu/ precise-updates restricted main multiverse universe

## N.B. software from this repository is ENTIRELY UNSUPPORTED by the Ubuntu
## team. Also, please note that software in universe WILL NOT receive any
## review or updates from the Ubuntu security team.
deb http://us.archive.ubuntu.com/ubuntu/ precise universe
deb http://us.archive.ubuntu.com/ubuntu/ precise-updates universe

## N.B. software from this repository is ENTIRELY UNSUPPORTED by the Ubuntu 
## team, and may not be under a free licence. Please satisfy yourself as to 
## your rights to use the software. Also, please note that software in 
## multiverse WILL NOT receive any review or updates from the Ubuntu
## security team.
deb http://us.archive.ubuntu.com/ubuntu/ precise multiverse
deb http://us.archive.ubuntu.com/ubuntu/ precise-updates multiverse

## N.B. software from this repository may not have been tested as
## extensively as that contained in the main release, although it includes
## newer versions of some applications which may provide useful features.
## Also, please note that software in backports WILL NOT receive any review
## or updates from the Ubuntu security team.
deb http://us.archive.ubuntu.com/ubuntu/ precise-backports main restricted universe multiverse
#Addedby software-properties
deb-src http://us.archive.ubuntu.com/ubuntu/ precise-backports main restricted universe multiverse

deb http://security.ubuntu.com/ubuntu/ precise-security main restricted
#Addedby software-properties
deb-src http://security.ubuntu.com/ubuntu/ precise-security restricted main multiverse universe
deb http://security.ubuntu.com/ubuntu/ precise-security universe
deb http://security.ubuntu.com/ubuntu/ precise-security multiverse

## Uncomment the following two lines to add software from Canonical's
## 'partner' repository.
## This software is not part of Ubuntu, but is offered by Canonical and the
## respective vendors as a service to Ubuntu users.
deb http://archive.canonical.com/ubuntu/ precise partner
deb-src http://archive.canonical.com/ubuntu/ precise partner

## This software is not part of Ubuntu, but is offered by third-party
## developers who want to ship their latest software.
deb http://extras.ubuntu.com/ubuntu/ precise main
deb-src http://extras.ubuntu.com/ubuntu/ precise main

# deb http://download.virtualbox.org/virtualbox/debian/ precise contrib

Step5:- sudo apt-get update

Hope U Like it......
Thanking You

Ubuntu 14.04

Lamp Installation in Ubuntu

Root Password Reset in Ubuntu

Linux Mint 17

Own Blogger Website
Install Free BSD

Saturday, August 9, 2014

How to Install Python 3.4.1 in Windows 7

August 09, 2014
How to Install Python 3.4.1 in Windows 7


Hello Everyone,

In this tutorial,

Let us Install Python 3.4.1 on Windows 7 --  64Bit or 32Bit

     Note :- Watch Next Video on How to Python 3.4.1 in Redhat Linux or Ubuntu

Download Python 3.4.1 by Clicking Below Link

NOTE :- For Any Clarification Please Below

Comment,
Like and
Share  us  and  help us to spread.

####--------------------------------------------------------------------------------------####
Website    :-   http://www.cloudnetwork.in
Twitter     :-   http://twitter.com/itcloudnet
Skype Id  :-   cloud.network1
E-Mail Id :-   itcloudnet@gmail.com
####----------------------------------------------------------------------------------------####                         
Thanking You
Hope U Like it........

Thursday, August 7, 2014

How to Install Lamp(Apache, MySql DB, PhpMyAdmin) in Ubuntu 14.04/14.10 Server or Desktop

August 07, 2014
How to Install Lamp(Apache, MySql DB, PhpMyAdmin) in Ubuntu 14.04/14.10 Server or Desktop

Hello Everyone,

In this tutorial,

Let us Install LAMP(Apache, MySQL DB, PhpMyAdmin) on Ubuntu Server & Desktop 12.04/14.04/14.10 -- 64 Bit.

You Can also Install in Linux Mint 17 or Debian 7.

                            Installation Apache
I'm running all the steps in this tutorial with root privileges, so make sure you're logged in as ROOT:                
Step1:- sudo su

Update ubuntu repositories by giving the below command

Step2:- sudo apt-get update & sudo apt-get upgrade -y

Step3:- sudo apt-get install apache2

Step4:- Testing Apache:-

                           Installation MySQL
Step5:- sudo apt-get install mysql-server mysql-client
                                              or
sudo apt-get install mysql-server libapache2-mod-auth-mysql php5-mysql

You can verify the MySQL server status using command:
Step6:- sudo service mysql status

Sample output:
mysql start/running, process 3470
                
                          Installation PHP
Step11:- sudo apt-get install php5 php5-mysql libapache2-mod-php5

Test PHP
Create a sample “testphp.php” file in Apache document root folder.

Step12:- sudo nano /var/www/html/testphp.php
Add the following lines.
&lt?php
phpinfo;
?&gt

Restart apache2 service:
Step13:- sudo service apache2 restart    or   /etc/init.d/apache2 restart

Testing testphp
e.g. localhost:testphp or http://192.168.0.100/testphp.php

If you want to install all php modules enter the command
Step14:- sudo apt-get install php* and restart the apache2 service.

To verify the modules, open web browser and navigate to
 You will able to see all installed php modules.

                         Installation phpMyAdmin
Step15:- sudo apt-get install phpmyadmin

Web server to reconfigure automatically: -- apache2
Configure database for phpmyadmin with dbconfig-common? -- yes
Enter MySQL application password phpmyadmin   --- 123456

Step16:- Afterwards, you can access phpMyAdmin under:- http://192.168.0.100/phpmyadmin/

                             Installation MariaDB --- Optional
First you have to remove existing MySQL packages if any.
To completely uninstall MySQL along with its configuration files,
enter the following command:
Step7:- sudo apt-get purge mysql*

Run the following command to remove unwanted packages.
Step8:- sudo apt-get autoremove

Now, add MariaDB repository. Run the following commands to add PPA. Hence, MariaDB 5.5 repository is not yet updated to 14.04, we can use the repository of Ubuntu 13.10 instead.
Step8:- sudo apt-get install software-properties-common
          
 sudo apt-key adv --recv-keys-keyserverhkp://keyserver.ubuntu.com:80 0xcbcb082a1bb943db
       
sudo add-apt-repository 'deb http://ftp.yz.yamagata-u.ac.jp/pub/dbms/mariadb/repo/5.5/ubuntu saucy main'

Update the software sources list and install MariaDB using following commands:
Step9:- sudo apt-get update
           sudo apt-get install mariadb-server mariadb-client

Check if mariadb is running or not, using the following command:
Step10:-  sudo service mysql status

Sample output:
 * /usr/bin/mysqladmin  Ver 9.0 Distrib 5.5.37-MariaDB, for debian-linux-gnu on i686

To set or Reset MySql Root Password in Ubuntu 14.04 LTS
Once you have installed MySQL, we should activate it with this command:
Step2 :-  sudo mysql_install_db
sudo /usr/bin/mysql_secure_installation
The prompt will ask you for your current root password
root password. Go ahead and choose N and move on to the next steps
Remove anonymous users?  y 
Disallow root login remotely?  y
Remove test database and access to it?  y
Reload privilege tables now?  Y

NOTE :- For Any Clarification Please Below

Comment,
Like and
Share  us  and  help us to spread.

####--------------------------------------------------------------------------------------####
Website    :-   http://www.cloudnetwork.in
Twitter     :-   http://twitter.com/itcloudnet
Skype Id  :-   cloud.network1
E-Mail Id :-   itcloudnet@gmail.com
####----------------------------------------------------------------------------------------####                         
Thanking You
Hope U Like it........

Monday, August 4, 2014

How to Reset Root Password in Redhat Linux 6 or 7

August 04, 2014
How to Reset Root Password in Redhat Linux 6 or 7

Hello Everyone,

In this tutorial,

Let us Install Reset Root Password on Redhat Linux 6 or 7 -- 64Bit or 32Bit

     Note :- Watch Next Video on How to Reset Root Password in CentOS 7
https://www.youtube.com/watch?v=ljj3ebPUd8s&list=PLmMAzSMza_1c8iKqez6CJlvJ-AJEi1Rm4

     Note :- Watch Next Video on How to Reset Root Password in Fedora 21, 20

Procedure…..

Fix Broken Sudo.......

Errors that you are getting..........

Error 1:-  you may notice an error saying you're not in the sudoers file and the incident is going to be reported.

Error 2:-  sorry user usuario is not allowed to execute '/usr/bin/passwd root' as root on.

Cause and symptoms :-

the /etc/sudoers file has been altered to no longer allow users in the admin group to escalate privilege

the permissions on the /etc/sudoers file are changed to something other than 0440
a user who should not have been has been taken out of the admin group.

By above error and cause can be done by following steps.....

To Reset Root Passwd

step1 :- Restart your server or desktop

step2 :- press continue shift untill boot menu show

step3 :- select ubuntu generic second option press Enter

step4 :- then select root shell press Enter

step5 :- type mount -o rw,remount /

step6 :- sudo passwd root or passwd root
           assign passwd and then repeat again the same passwd

Note :- in place of root you can set your name,hostname any name that u assign during installation OR Login.

You can also Create NEW USER
step7 :- sudo adduser ubuntu and give new passwd

NOTE :- For Any Clarification Please Below

Comment,
Like and
Share  us  and  help us to spread.

####--------------------------------------------------------------------------------------####
Website    :-   http://www.cloudnetwork.in
Twitter     :-   http://twitter.com/itcloudnet
Skype Id  :-   cloud.network1
E-Mail Id :-   itcloudnet@gmail.com
####----------------------------------------------------------------------------------------####                         
Thanking You
Hope U Like it........