Cloud Network

Networking | Support | Tricks | Troubleshoot | Tips

Buymecoffe

Buy Me A Coffee

Wednesday, August 27, 2014

Basic Router Command and Its Protocol, WLAN

August 27, 2014
Basic Router Command and Its Protocol, WLAN

Basic Router Command
The following are some important commands that can be used to edit and review command history buffer. It will be useful to practice these commands.

<ctrl> A : Move to the beginning of the command line
<ctrl> E : Move to the end of the command line
<ctrl> F : Move forward one character, same as using "Right Arrow".
<ctrl> B : Move backward one character, same as using "Left Arrow".
<ctrl> P : Repeat Previous command, same as using "Up Arrow".
<ctrl> N : Repeat Next (more recent) command, same as using "Down Arrow".
<esc> B : Moves to beginning of previous word.
<esc> F : Moves to beginning of next word.
<ctrl> R : Creates new command prompt, followed by all the characters typed at the last one.
   

Keyboard Shortcut                          Action

Up Arrow     Displays your previous commands.  (command history)
TAB Key            Completes a partially typed CLI commands.
CTRL+Z             Takes you back to Privileged EXEC Mode.
CTRL+A             Places the cursor at the beginning of a line.
CTRL+E             Places the cursor at the end of a line.
CTRL+R             Redisplays the current command line.
CTRL+W            Erases a word (behind the cursor).
CTRL+U             Erases an entire line.


Here is a summary of Cisco IOS router command prompts:

Router> - User EXEC mode
Router# - Privileged EXEC mode
Router(config)# - Global configuration mode
Router(config-if)# - Interface level configuration mode
Router(config-router)#-Routing engine levelwithinconfigurationmode
Router(config-line)# - Line level (vty, tty, async) within configuration mode


Router#show cdp neighbors

Capability Codes: R - Router, T - Trans Bridge, B - Source Route Bridge
                  S - Switch, H - Host, I - IGMP, r - Repeater


There are two types of configuration files on a router:

Running config - The configuration currently running on the router. Stored in RAM.
Startup config - Saved configuration stored in NVRAM.

To save the running configuration to the startup configuration use the following command.

Router# copy running-config startup-config

or

Router# copy run start


 The various states of an interface :-


Ethernet0 is up, line protocol is up - The interface is functioning correctly.

Ethernet0 is down, line protocol is down - This message usually represents a physical interface problem. The cable may be disconnected. This can also occur if this interface is connected to another router whose interface has been shutdown.

Ethernet0 is up, line protocol is down - The Physical layer connectivity is not the issue. The line protocol being down is either a clocking issue (keepalives) or a mismatch of the frame types being used on connected devices.

Ethernet0 is administratively down, line protocol is down - The interface has been manually shutdown using the shutdown command.

                 WLANs
802.11b           2.4GHz, 11Mbps
802.11n           2.4GHz or 5GHz, 300Mbps
802.11a           5GHz, 54Mbps
802.11g           2.4Ghz, 54Mbps

WEP   ---    Original IEEE wireless security standard.Easily hacked.
WPA   ---    Wireless security standard created by the Wi-Fi 
Alliance. Uses a dynamic key for greatly improved Security over WEP.
Interoperable with different vendors products.
CSMA/CA  ---  Network access method used in wireless networking & uses a proactive algorithm to avoid collisions.
WPA-2   ---   Ratified by the IEEE in 2005 who named it IEEE 802.11i & Uses AES encryption.


                       Protocols

What is the difference between TCP and IP?
IP is a connectionless protocol, it is used for network addressing and is a routed protocol.
TCP is a connection-oriented protocol used for reliable transmission by the Transport layer.

Finds a hardware address from a known IP address?
Address Resolution Protocol (ARP)

RIPv2
Distance vector, 120 admin distance, hop count metric, classless

OSPF
Link state, 110 admin distance, bandwidth metric, classless

IGRP
Distance vector, 100 admin distance, metric bandwidth and delay, classful, Cisco proprietary

Protocol responsible for network addressing and routing through an internetwork
Internet Protocol (IP)

Gather useful information about neighbour devices such as hardware and protocol information
Cisco Discovery Protocol (CDP)

Connectionless protocol at the Transport layer
User Datagram Protocol (UDP)

Layer 2 protocol used to prevent network loops
Spanning Tree Protocol (STP)

RIP
Distance vector, hop count metric, 120 admin distance, classful

Protocol used by a host computer to request its IP address
Reverse Address Resolution Protocol (RARP)

                  
                   Internal Router Components

What is NVRAM(Non-volatile random access memory)?
Stores config and config register

What is ROM ?
Holds POST, bootstrap and mini-IOS

What is Power on self test (POST) ?
Checks hardware and interfaces on start-up
Config register
Controls how router boots

What is Flash ?
 That's Stores in IOS

Mini-IOS
Small IOS used for maintenance

RAM(Random Access Memory)
Holds routing tables and running config

ROM(Read Only Memory) that Stored in ROM, brings up router on boot
Bootstrap

ROM monitor is Used for testing and troubleshooting


Thanks
Hope You Like :)
CloudNetwork: Basic Router Command.

Ubuntu 14.04

Linux Mint 17

Python

Nagios

Oracle Linux 7
Reset Root Password

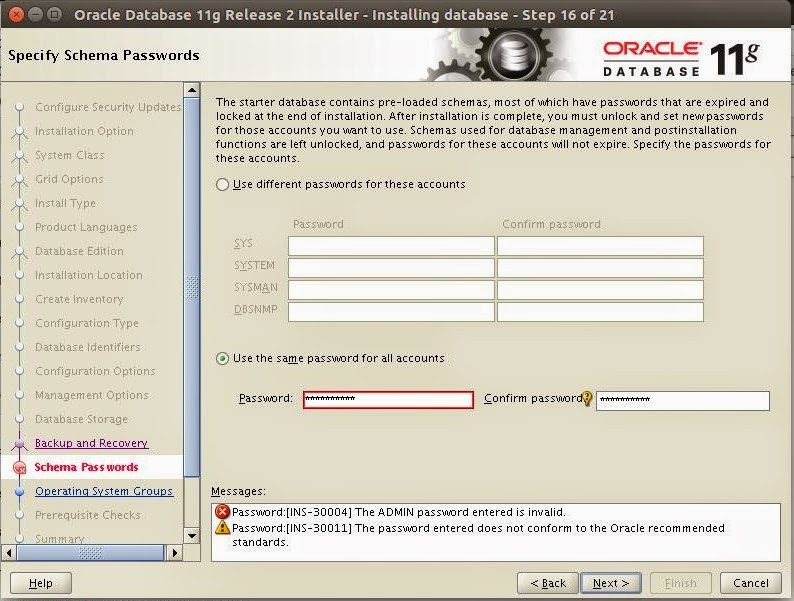
How to Fix "The ADMIN Password Entered is Invalid" in Oracle DB 11g R2

August 27, 2014
How to Fix "The ADMIN Password Entered is Invalid" in Oracle DB 11g R2
Oracle Database 11g R2

The Criteria of Password Doesn't Meet Means.
You should not includ any Character in this box (!@$%&*) that means Oracle 
recommended to avoid that type of password. you can use only small character.

Thanking You
Hope U Like it.........

Fedora 20 in Virtual box

Roboform in linux

Ubuntu server 12.04

Nagios 4.0.7

Oracle Linux 7
Free BSD 10

Monday, August 25, 2014

How to Fix "no talloc stackframe at ../source3/param/loadparm.c:4864, leaking memory" in Ubuntu 14.04

August 25, 2014
How to Fix "no talloc stackframe at ../source3/param/loadparm.c:4864, leaking memory" in Ubuntu 14.04
Error :-   no talloc stackframe at ../source3/param/loadparm.c:4864, leaking memory
This Message is Related to Samba Password Syncing. To Resolve it Follow Below Steps. 
Step1:- sudo su (logging as a Root)
Step2:- pam-auth-update (Press Enter)
PAM Configuration
Step3:- Deselect the Samba Password Synchronization

 Thanking You
Hope U Like it......

Ubuntu 14.04

Linux Mint 17

Ubuntu Root Password Reset

Lamp in Ubuntu 14.04

Redhat Linux 7 server
Gentoo Linux 12.1

Thursday, August 21, 2014

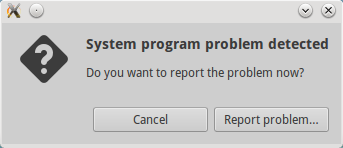
How to fix “System Program Problem Detected” Error on Ubuntu 14.04

August 21, 2014
How to fix “System Program Problem Detected” Error on Ubuntu 14.04

System Program Detected Error

Remove crash report files

The apport system creates crash report files in the /var/crash directory. These crash report files cause the error message to appear everytime Ubuntu boots

Step1 :- cd /var/crash 
Step2 :- ls (Just Remove all below crash)
_opt_google_chrome_chrome.1000.crash
_usr_lib_chromium-browser_chromium-browser.1000.crash
_usr_sbin_ulatencyd.0.crash
_usr_share_apport_apport-gtk.1000.crash 
Step3 :- sudo rm /var/crash/* 

Turn off apport. 

After removing the old crash reports, if you still get the same error message, then you can completely turn off apport to get rid. Edit the configuration file at /etc/default/apport.

Step4 :- gksudo gedit /etc/default/apport
# set this to 0 to disable apport, or to 1 to enable it
# you can temporarily override this with
# sudo service apport start force_start=1
enabled=1
Step5 :- enabled=0
Step6 :- sudo restart apport 
Thanking You
Hope U Like it........


Reset Root Password in linux

Linux Mint 17

pendrive bootable for ubuntu

Nagios 4.0.7

Oracle Linux 7
Fedora 20

How to Fix "Oracle is Not in the Sudoers File" in Ubuntu 14.04

August 21, 2014
How to Fix "Oracle is Not in the Sudoers File" in Ubuntu 14.04
ubuntu is not in the sudoers file
Error :- oracle is not in the sudoers file.  This incident will be reported.
 you can fix this error not only in ubuntu 14.04 but also in ubuntu 12.04 / 12.10.

Ans :- To give the sudo permission to a oracle we need to add the user to the file /etc/sudoers file.


Step1 :- sudo su (logging as a Root)
Step2 :- sudo nano /etc/sudoers or sudo vi /etc/sudoers
Step3 :- Add Line
Add Line            


 oracle ALL = (ALL)ALL (under the user privilege specification section)
Step4 :- Save and Exit
Note :- In place of Ubuntu you can right any name, just replace it

Thanking You
Hope U Like it............

Oracle Linux 7

Fedora 20 in Virtual box

Nagios 4.0.7

Roboform in linux

Ubuntu server 12.04
Zimbra Desktop 7

Wednesday, August 20, 2014

How to Fix "Unable to Resolve HostName" in Ubuntu 14.04

August 20, 2014
How to Fix "Unable to Resolve HostName" in Ubuntu 14.04
Error :- unable to resolve host Ubuntu 12.04 / 12.10 / 13.04 / 14.04

Open the Terminal and Type
Step1 :- cat /etc/hosts      ----  To Check Hostname
Step2 :- cat /etc/hostname   ----  To Check Hostname          
Both host name should be Same in hosts and hostname file ....if not means see next step3.
Hosts File in Linux

Step3:- Open hosts and hostname both Should be Remove (cloud or any name if there. See Below Images) 
Step4 :- Save and Exit by (press ctrl+x) then pres (yes) 
/etc/hosts 
Step5:- cat /etc/hosts  
hostname in ubuntu

cat /etc/hostname and cat /etc/hosts both Name should be Match.


Thanking You
Hope U Like It............

Windows Server 2008

Orientdb NoSQL part2

Python 3.4.1

Install OrientDB Document Graph

Netbeans IDE
Vtiger CRM Database

How to Install & Setup Nagios Core 4.0.7 Network Monitoring Tool in Ubuntu 14.04 Server

August 20, 2014
How to Install & Setup Nagios Core 4.0.7 Network Monitoring Tool in Ubuntu 14.04 Server
How to Install & Setup Nagios Core 4.0.7
Hello Everyone,

In this tutorial, let us Install Nagios

How to Install Nagios Core 4.0.7 and Nagios Plugins 2.0.3 Latest Version in Ubuntu 14.04 Server.

1. Software Required
Nagios 4.0.7.tar.gz
Nagios plugins 2.0.3.tar.gz

2. You Need to Login With Root to Perform all Command
Step1 :- sudo su

3. Installed packages
Step2 :- sudo apt-get install apache2 build-essential daemon libapache2-mod-php5 libgd2-xpm libgd2-xpm-dev php5-gd unzip wget sendmail

4. Installation Part
Update ubuntu repositories by giving the below command
Step3 :- sudo apt-get update
Step4 :- sudo apt-get upgrade

5. Install package
Step5:- sudo apt-get install apache2 php
Step6:- sudo apt-get install gcc glibc-common
Step7:- sudo apt-get install gd gd-devel

6. Create Nagios User,  Group and Password
Step8:-  useradd nagios  or    /usr/sbin/useradd -m nagios
Step9:-   passwd nagios
Step10:-  groupadd nagcmd  or   /usr/sbin/groupadd nagcmd
Step11:-  usermod -G nagcmd nagios
            usermod -G nagcmd apache    or  /usr/sbin/usermod -a -G nagcmd nagios

7. Download Nagios Core 4.0.7 and Nagios Plugin 2.0.3
Step12:-  mkdir /root/nagios
Step13 :-  cd /root/nagios

Step14:- sudo wget http://prdownloads.sourceforge.net/sourceforge/nagios/nagios-4.0.7.tar.gz
Step15:- sudo wget https://www.nagios-plugins.org/download/nagios-plugins-1.5.tar.gz
                OR DIRECT D/L LINK
http://www.nagios.org/download/core

8. Unzip the download nagios
Step13:- tar xvf nagios-4.0.7.tar.gz

Step:- ll (two new folders will appear in that directory)

Step14:- cd nagios-4.0.7.tar.gz
Step15:-   ./configure  --with-command-group=nagios--with-command-group=nagcmd --with-mail=/usr/bin/sendmail
Step16:- make all
Step17:- make install
Step18:- make install-init     ----  scripts
Step19:- make install-config   ----  configuration file
Step20:- make install-commandmode  ----  external dir command
Step21:- make install-webconf      ----  apache and nagiso config file install

1. In this step, we will be creating a password for “nagiosadmin"
2. Keep it remember because this password will be used when you login in the Nagios Web interface.

Step:-  htpasswd -s -c /usr/local/nagios/etc/htpasswd.users nagiosadmin

9. Customizing Nagios Configuration
Step22 :-  vi /usr/local/nagios/etc/objects/contacts.cfg

11. Unzip the download nagios
Step25:- cd /home/download  or cd /root/nagios
Step26:- tar xvf nagios-2.03.tar.gz
Step27:- cd nagios-2.0.3.tar.gz
Step28:-   ./configure --with-nagios-user=nagios --with-nagios-group=nagios
Step29:- make all
Step30:- make install

12. Copy and link Nagios Apache configuration
Step31:- sudo cp /etc/apache2/conf.d/nagios.conf /etc/apache2/sites-available/nagios
Step32:- sudo ln -s /etc/apache2/sites-available/nagios /etc/apache2/sites-enabled/nagios

14. Check Nagios configuration for errors
Step33:- sudo /usr/local/nagios/bin/nagios -v /usr/local/nagios/etc/nagios.cfg

15. Make Nagios and Apache start at boot
Step34:- sudo ln -s /etc/init.d/nagios /etc/rcS.d/S98nagios
Step35:- sudo ln -s /etc/init.d/apache2 /etc/rcS.d/S99apache2
Step36:- chkconfig -add nagios
Step37:- chkconfig nagios on

16. Start Nagios Core 4.0.7 Service
step38 :- sudo service nagios start

17. Start Apache Service
step39 :- sudo service apache2 start

                  TESTING TIME

 Visit Nagios URL in your browser
http://IPADDRESS/nagios  or http://domainname.cm/nagios
username:- nagiosadmin and password:- created in step 8

18. To Add New User & Reset Password
The user's credentials password are stored in
     /etc/nagios3/htpasswd.users

19. To change the nagiosadmin password.
step43:- sudo htpasswd /etc/nagios3/htpasswd.users nagiosadmin

 20. To add a user
step44:- sudo htpasswd /etc/nagios3/htpasswd.users steve

                 ERROR
Error 1 after login :-  error could not read object configuration data nagios 4 run nagios as daemon.

Step40:- sudo /usr/local/nagios/bin/nagios -d /usr/local/nagios/etc/nagios.cfg

Error 1 after login:-  It appears as though you do not have permission to view information for any of the hosts you requested.

Step41:- sudo nano /usr/local/nagios/etc/cgi.cfg
Step42:- sudo service nagios restart

NOTE :- For Any Clarification Please Comment Below

Thanking You
Hope U Like it........

Own Website

Vtiger Open Source

Install Vtiger CRM

Tortoise installation SVN

Notepad++ install
Ubuntu Server 12.04