Cloud Network

Networking | Support | Tricks | Troubleshoot | Tips

Buymecoffe

Buy Me A Coffee

Wednesday, August 27, 2014

HowTo Setup AutoFS and Automount (NFS, local, SMBFS) Linux Command

August 27, 2014
HowTo Setup AutoFS and Automount (NFS, local, SMBFS) Linux Command
NFS & AutoFS

###AutoFS###
Features:
 1. Automatically mounts file systems (NFS, local, SMBFS, etc.) upon I/O request


Requirements:
 1. autofs-*rpm must be installed

/etc/auto.master - primary configuration file
 - also contains mount points and their mappings

/etc/sysconfig/autofs - default startup directives

Note: AutoFS must be running in order to auto-mount directories


Task: 
 1. Create an automount for /shares, which will mount /nfs1 & /nfs2
  a. update /etc/auto.master - '/shares /etc/auto.shares'
  b. cp /etc/auto.misc /etc/auto.shares
  c. update the rules in /etc/auto.shares
  d. Create AutoFS tree: /shares/
  e. Restart the autofs service
  f. Unmount: /nfs1 & /nfs2 if necessary
Note: Do NOT auto-mount directories that are already mounted
  g. Test access to AutoFS controlled directory
   g1. 'ls -l /shares/nfs1'

Note: syntax for auto-mount files is as follows:
<mount-point>  [<options>]  <location>
nfs1    -fstype=nfs 192.168.75.199:/nfs1

Thanking You
Hope U Like it...

Windows Server 2008

Orientdb NoSQL part2

Python 3.4.1

Install OrientDB Document Graph

Netbeans IDE
Vtiger CRM Database

How to Configure Apache Web Server in Linux

August 27, 2014
How to Configure Apache Web Server in Linux
Configure Apache Web Server


Apache Web Server
 Features:
  1. WWW Web Server
  2. Modular

Tasks:
 1. Install Apache 2.2x
  a. httpd*rpm

/etc/httpd - top-level configuration container on RH5
/etc/httpd/conf - primary configuration directory

/etc/httpd/conf/httpd.conf - primary Apache configuration file

/etc/httpd/conf.d - drop-in configuration directory, read by Apache upon startup

 2. Explorer: /etc/httpd/conf/httpd.conf

  a. HTTPD runs as: apache:apache
  b. Apache maintains, always, a 'main' server, which is independent of Virtual Hosts. This server is a catch-all for traffic that doesn't match any of the defined virtual hosts.

  c. <Directory> directive governs file system access.
Note: The primary Apache process runs as 'root', and has access to the full file system. However, <Directory> directive restricts the web-user's view of the file system.

  d. Test access to '.ht*' files from web root

  e. ErrorLog logs/error_log - default error log file for ALL hosts
  f. logs/access_log - default log file for default server

 Note: Every directory, outside of the 'DocumentRoot' should have at least one: <Directory> directive defined.

 3. Start Apache and continue to explore
  a. service httpd start
root        31324     1      0 10:17 ?        00:00:00 /usr/sbin/httpd
apache   31326 31324  0 10:17 ?        00:00:00 /usr/sbin/httpd
apache   31327 31324  0 10:17 ?        00:00:00 /usr/sbin/httpd
apache   31328 31324  0 10:17 ?        00:00:00 /usr/sbin/httpd
apache   31329 31324  0 10:17 ?        00:00:00 /usr/sbin/httpd
apache   31330 31324  0 10:17 ?        00:00:00 /usr/sbin/httpd
apache   31331 31324  0 10:17 ?        00:00:00 /usr/sbin/httpd
apache   31332 31324  0 10:17 ?        00:00:00 /usr/sbin/httpd
apache   31333 31324  0 10:17 ?        00:00:00 /usr/sbin/httpd

Note: Parent Apache runs as 'root' and can see the entire file system
Note: However, children processes run as 'apache' and can only see files/directories that 'apache:apache' can see

 4. Create an Alias for content outside of the web root (/var/www/html)
  a. Alias /testalias1 /var/www/testalias1
     <Directory /var/www/testalias1>
    AllowOverride Non
    order allow,deny
    allow from all
     </Directory>

 5. Ensure that Apache will start when the system boots
  a. chkconfig --level 35 httpd on && chkconfig --list httpd

Virtual Hosts Configuration:
 Features:
  1. Ability to share/serve content based on 1 or more IP addresses
  2. Supports 2 modes of Virtual Hosts:
   a. IP Based - one site per IP address
   b. Host header names - multiple sites per IP address


Tasks:
  1. Create IP Based Virtual Hosts
   a. ifconfig eth0:1 192.168.75.210
   b. Configure the Virtual Host:

<VirtualHost 192.168.75.210>
    ServerAdmin webmaster@linuxcbtserv4.linuxcbt.internal
    ServerName site1.linuxcbt.internal
    DocumentRoot /var/www/site1
    <Directory /var/www/site1>
        Order allow,deny
        Allow from all
    </Directory>
    CustomLog logs/site1.linuxcbt.internal.access.log combined
    ErrorLog logs/site1.linuxcbt.internal.error.log
</VirtualHost>

  c. Create: /var/www/site1 and content
  d. Update: /etc/httpd/conf/httpd.conf with VHost information


 2. Create Name-based Virtual Hosts using the primary IP address
  a. /etc/httpd/conf/httpd.conf: 
   NameVirtualHost 192.168.75.199:80

<VirtualHost 192.168.75.199:80>
    ServerAdmin webmaster@linuxcbtserv4.linuxcbt.internal
    ServerName site3.linuxcbt.internal
    DocumentRoot /var/www/site3
    <Directory /var/www/site3>
        Order allow,deny
        Allow from all
    </Directory>
    CustomLog logs/site3.linuxcbt.internal.access.log combined
    ErrorLog logs/site3.linuxcbt.internal.error.log
</VirtualHost>
 

###Apache with SSL Support###
 Features:
  1. Secure/Encrypted communications

 Requirements:
  1. httpd
  2. openssl
  3. mod_ssl
  4. crypto-utils (genkey) - used to generate certificates/private keys/CSRs
    a. also used to create a self-signed certificate

Tasks:
  1. Install the requirements
   a. mod_ssl - module for Apache, which provides SSL support
   yum -y install mod_ssl
    /etc/httpd/conf.d/ssl.conf - includes key SSL directives

   b. crypto-utils - provies /usr/bin/genkey

  2. Generate SSL usage keys using: genkey
   a. genkey site1.linuxcbt.internal - creates text-gui interface

  3. Update /etc/httpd/conf.d/ssl.conf to reference the new keys (public/private)

  4. Restart the HTTPD server
   a. service httpd restart
   b. httpd -S
 
  5. Test HTTPS connectivity
   a. https://192.168.75.199

Note: For mutliple SSL sites, copy the: /etc/httpd/conf.d/ssl.conf file to distinct files, that match your distinct IP-based VHosts.


Thanking You
Hope U Like it....

Own Website

Vtiger Open Source

Install Vtiger CRM

Tortoise installation SVN

Notepad++ install
Ubuntu Server 12.04

Linux Booting Process and Its Init and Shutdown Command

August 27, 2014
Linux Booting Process and Its Init and Shutdown Command
Linux Booting Process

BIOS initilization
Boot Loader
Kernel initilization
Init


Boot Loader

stage 1 resides in MBR its small 512bytes 
(446 bytes of programme code, 64bytes of Partition table and 2 magic no (valid mbr)
stage 2 loaded from boot partition
for linux to boot min require
label
kernal location
root filesystem location
initial ram disk

Grub
/etc/grub/grub.conf (have these settings)

Kernal initilization
 device detection, loads device drivers, mount filesystems read only, then load init.
/etc/inittab
specifies runlevel
0    :    hault ( do not set init default to this)
1    :    single user mode
2    :    multi user mode without networking
3    :    multi-user mode with networking
4    :    unused
5    :    X11 (Graphical)
6    :    reboot
id:5:initdefault
/etc/rc.d/rc.sysinit

(selinux,kernal parameters (sysctl.conf),swap partitions, hostname, filesystem checking and remounting
RAID, LVM ,disk quotas)

/etc/rc.d/rc
/etc/rc.d/rc?.d/  (runlevel specific services )
/etc/rc.d/rc.local


1. Linux boot process.

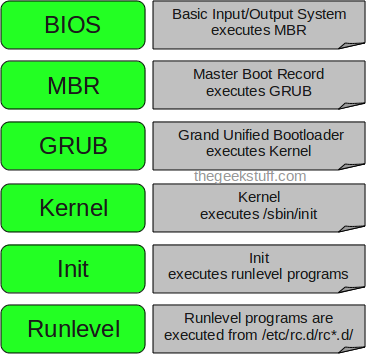
The following are the 6 high level stages of a typical Linux boot process.

1.1. BIOS
  • BIOS stands for Basic Input/output System
  • Performs some system integrity checks
  • Searches, loads, and executes the boot loader program.
  • It looks for boot loader in floppy, cd-rom, or hard drive. You can press a key (typically F12 of F2, but it depends on your system) during the BIOS startup to change the boot sequence.
  • Once the boot loader program is detected and loaded into the memory, BIOS gives the control to it.
  • So, in simple terms BIOS loads and executes the MBR boot loader.
1.2. MBR
  • MBR stands for Master Boot Record.
  • It is located in the 1st sector of the bootable disk. Typically /dev/hda, or /dev/sda
  • MBR is less than 512 bytes in size. This has three components 1) primary boot loader info in 1st 446 bytes 2) partition table info in next 64 bytes 3) mbr validation check in last 2 bytes.
  • It contains information about GRUB (or LILO in old systems).
  • So, in simple terms MBR loads and executes the GRUB boot loader.
1.3. GRUB
  • GRUB stands for Grand Unified Boot loader.
  • If you have multiple kernel images installed on your system, you can choose which one to be executed.
  • GRUB displays a splash screen, waits for few seconds, if you don’t enter anything, it loads the default kernel image as specified in the grub configuration file.
  • GRUB has the knowledge of the filesystem (the older Linux loader LILO didn’t understand filesystem).
  • Grub configuration file is /boot/grub/grub.conf (/etc/grub.conf is a link to this). The following is sample grub.conf of CentOS.
#boot=/dev/sda
default=0
timeout=5
splashimage=(hd0,0)/boot/grub/splash.xpm.gz
hiddenmenu
title CentOS (2.6.18-194.el5PAE)
root (hd0,0)
kernel /boot/vmlinuz-2.6.18-194.el5PAE ro root=LABEL=/
initrd /boot/initrd-2.6.18-194.el5PAE.img
  • As you notice from the above info, it contains kernel and initrd image.
  • So, in simple terms GRUB just loads and executes Kernel and initrd images.
1.4. Kernel
  • Mounts the root file system as specified in the “root=” in grub.conf
  • Kernel executes the /sbin/init program
  • Since init was the 1st program to be executed by Linux Kernel, it has the process id (PID) of 1. Do a ‘ps -ef | grep init’ and check the pid.
  • initrd stands for Initial RAM Disk.
  • initrd is used by kernel as temporary root file system until kernel is booted and the real root file system is mounted. It also contains necessary drivers compiled inside, which helps it to access the hard drive partitions, and other hardware.
1.5. Init
  • Looks at the /etc/inittab file to decide the Linux run level.
  • Following are the available run levels
    • 0 – halt
    • 1 – Single user mode
    • 2 – Multiuser, without NFS
    • 3 – Full multiuser mode
    • 4 – unused
    • 5 – X11
    • 6 – reboot
  • Init identifies the default init level from /etc/inittab and uses that to load all appropriate programs.
  • Execute ‘grep initdefault /etc/inittab’ on your system to identify the default run level
  • If you want to get into trouble, you can set the default run level to 0 or 6. Since you know what 0 and 6 means, probably you might not do that.
  • Typically you would set the default run level to either 3 or 5.
1.6. Runlevel programs
  • When the Linux system is booting up, you might see various services getting started. For example, it might say “starting sendmail …. OK”. Those are the runlevel programs, executed from the run level directory as defined by your run level.
  • Depending on your default init level setting, the system will execute the programs from one of the following directories.
    • Run level 0 – /etc/rc.d/rc0.d/
    • Run level 1 – /etc/rc.d/rc1.d/
    • Run level 2 – /etc/rc.d/rc2.d/
    • Run level 3 – /etc/rc.d/rc3.d/
    • Run level 4 – /etc/rc.d/rc4.d/
    • Run level 5 – /etc/rc.d/rc5.d/
    • Run level 6 – /etc/rc.d/rc6.d/
  • Please note that there are also symbolic links available for these directory under /etc directly. So, /etc/rc0.d is linked to /etc/rc.d/rc0.d.
  • Under the /etc/rc.d/rc*.d/ directories, you would see programs that start with S and K.
  • Programs starts with S are used during startup. S for startup.
  • Programs starts with K are used during shutdown. K for kill.
  • There are numbers right next to S and K in the program names. Those are the sequence number in which the programs should be started or killed.
  • For example, S12syslog is to start the syslog deamon, which has the sequence number of 12. S80sendmail is to start the sendmail daemon, which has the sequence number of 80. So, syslog program will be started before sendmail.

2. Software Package Administration

2.1 Querying software packages

To list the installed software:

rpm -qa | less
rpm -qa {software-name}
yum list | less
yum list {software-name}

For Debian use

dpkg --list
dpkg --list | less
dpkg --list | grep apache


2.2: Installing software packages

Note: Please note that you need to log in as root to install the software using rpm command:

Installing RPM in Redhat/Fedora/CentOS

RPM is nothing but a package management system. To install an rpm file, open a terminal and then type the following command:

$rpm -ivh xyz.rpm
$dpkg -i xyz.deb (debian packages)

Installing Packages from repositories (yum/apt)

$yum install {package-name-1}
e.g $yum install httpd

$apt-get install <package_name> (for debian)
e.g $apt-get install http

Installing package from source (tar.bz,tar.bz2)

1) Extract the package using

$tar –xzvf xyz.tar.bz (.tar.bz)
$tar –xjvf xyz.tar.bz2 (.tar.bz2)

2) Go to the extracted directory $cd xyz/

3) $./configure

4) $make

5) $make install


2.3 Upgrading the software package

$rpm -Uvh xyz.rpm
$yum update <Package_name>
$apt-get update <Package_name> (for debian)


2.4 Removing the software package

$rpm -e {software-name}
$yum remove {software-name}
$apt-get remove {software-name}


3. User and Group Administration

3.1 Creating and deleting users from the systems

Note: Please note that you need to log in as root to do this task

Creating:

$useradd <user_name>

If you want to assign a particular Home directory to the user you can do that using this command.

$useradd <user_name> -d /home/<user_name>

Command line options for useradd are detailed below:


Add a new user to primary group

$useradd –g <Group-name> <User-name>

Add a new user to secondary group

$useradd -G <Group-name> <User-name>

Deleting:

$userdel <user_name>

This will remove the user. But if you want to remove all the files and its home folder then use

$userdel –r <user_name>


3.2 Creating and deleting groups

To add a group to the system, use the command groupadd:

$groupadd <group-name>

Command line options for groupadd are detailed below:


To remove a group from the system, use the command groupdel:

$groupdel <group-name>

3.3 Modifying users/group profile.

Changing the password

$passwd <user-name>

Changing the home directory of user

$usermod –d <path_of_new_home_directory> <user_name>

To change the directory as well as move the contents use –m option

$usermod –m –d <path_of_new_home_directory> <user_name>


Adding existing user to a group

$usermod -a -G <Group-name> <User-name>

Changing existing primary group

$usermod –g <Group-name> <User-name>

Changing the user name

$usermod –l <new-name> <old-name>


3.4 Linux files responsible for User managements

/etc/shadow store all the Linux password in MD5 encryptions format
/etc/passwd store all user related information's
/etc/group store all group related information's

4. File permissions/ownerships in Linux

4.1 Changing the permissions of a file
Linux have three user classes as follows:
  • User (u): The owner of file
  • Group (g): Other user who are in group (to access files)
  • Other (o): Everyone else
You can setup following mode on each files. In a Linux set of permissions is called as mode:
  • Read (r)
  • Write (w)
  • Execute (x)
However, above three modes or permission have different meaning for file and directory:
Linux Read mode permissions
  • Read access on a file allows you to view file
  • Read access on a directory allows you to view directory contents with ls command
Write mode permissions
  • Write access on a file allows you to write to file
  • Write access on a directory allows you to remove or add new files
Execute mode permissions
  • Execute access on a file allows to run program or script
  • Execute access on a directory allows you access file in the directory


Octal representation
-rwx-rwx-rwx
1st rwx is for user
2nd rwx is for group
3rd rwx is for other
So if you want to give permissions use the below table
u g o
r w x r w x r w x
1 1 1 1 1 1 1 1 1  Permissions for read, write and execute

Now convert 111 in decimal which is equal to 7

Similarly for read only

u g o
r w x r w x r w x
1 0 0 1 0 0 1 0 0  Permissions for read only
Hence 4

777 (all can read write and execute)
666 (all can read and write)
700 (owner can read, write and execute)
600 (owner can read and write)

chmod command :
$chmod 777 <file-name>
Or
$chmod u+x <file-name> - give user execute priviliges
$chmod g+rx <file-name> - gives group read and execute permission

Recursive (-R)
$ chmod -R g+rwx /u01 – gives group read write and execute to all the files in /u10 directory

4.1 Changing the ownership of a file

drwxr-xr-t 3 root root 4096 Jul 12 2001 admin
-rwxr-xr-x 1 msp ocadmin 1282580 Jun 13 11:14 asn1c-0.9.21.tar.gz

Here in the above e.g. admin is owned by user root and group root and asn1c-0.9.21.tar.gz is owned by user msp and rroup ocadmin

chown command :

$chown <user-name>:<group-name> <file-name>

e.g. $chown abdul:admin xyz.txt

If you want to change the ownership of all the files in a specific directory use –R option

e.g. $chown –R abdul:admin /abc


5. Disk Partitioning and Mounting File System

Thanking You
Hope U Like it.....

Windows Server 2008

Notepad

Python 3.4.1

Nagios 4

Oracle Linux 7
How to Install Linux Mint 17