Cloud Network

Networking | Support | Tricks | Troubleshoot | Tips

Buymecoffe

Buy Me A Coffee

Tuesday, September 2, 2014

Error Message: /bin/rm Argument list too long Linux.

September 02, 2014
Error Message: /bin/rm Argument list too long Linux.
Xargs
When you are trying to delete too many files using rm, you may get error message: /bin/rm Argument list too long Linux. Use xargs to avoid this problem.

What is xargs ?
xargs is a very powerful command that takes output of a command and pass it as argument of another command. Following are some practical examples on how to use xargs effectively.

Xargs Example 1:- 
# find ~ -name *.log -print0 | xargs -0 rm -f

Xargs Example 2:-
Get a list of all the *.conf file under /etc/. There are different ways to get the same result. Following example is only to demonstrate the use of xargs. The output of the find command in this example is passed to the ls l one by one using xargs.
# find /etc -name "*.conf" | xargs ls l

Xargs Example 3:-
If you have a file with list of URLs that you would like to download, you can use xargs as shown below.
# cat url-list.txt | xargs wget c

Xargs Example 4:-
Find out all the jpg images and archive it.
# find / -name *.jpg -type f -print | xargs tar -cvzf images.tar.gz

Xargs Example 5:-

Copy all the images to an external hard-drive.
 # ls *.jpg | xargs -n1 -i cp {} /external-hard-drive/directory  

Thanking You
Hope U Like it........

Windows Server 2008

Orientdb NoSQL part2

Python 3.4.1

Install OrientDB Document Graph

Netbeans IDE
Vtiger CRM Database

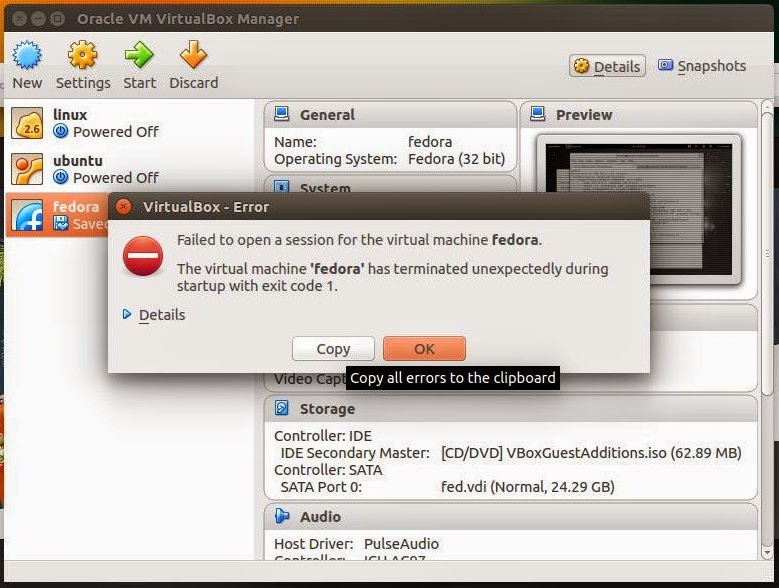
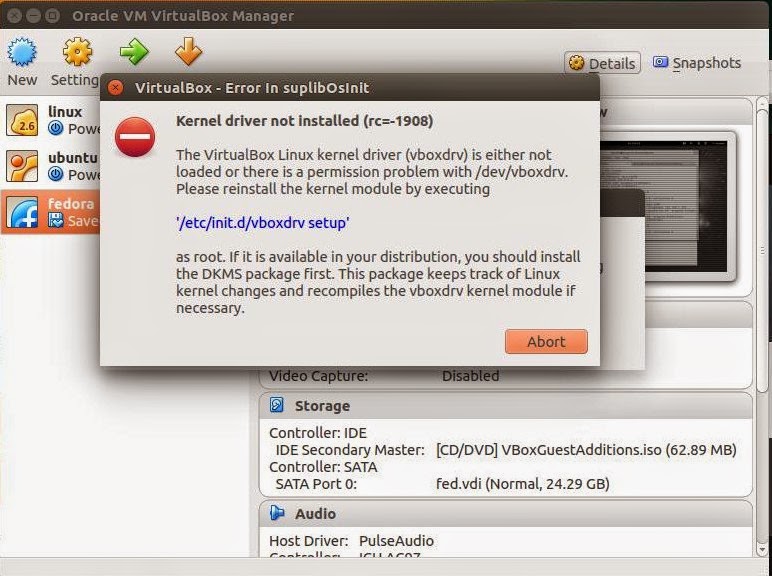
How to Resolve Kernel Driver not Installed(rc>1908) in Ubuntu 14.04

September 02, 2014
How to Resolve Kernel Driver not Installed(rc>1908) in Ubuntu 14.04
How to Resolve Kernel Driver Issue

Resolve Kernel Driver Issue(rc>1908)

1 sudo apt-get install --reinstall virtualbox-dkms
or 
sudo dpkg-reconfigure virtualbox-dkms sudo modprobe vboxdrv

sudo apt-get install linux-headers-`uname -r`

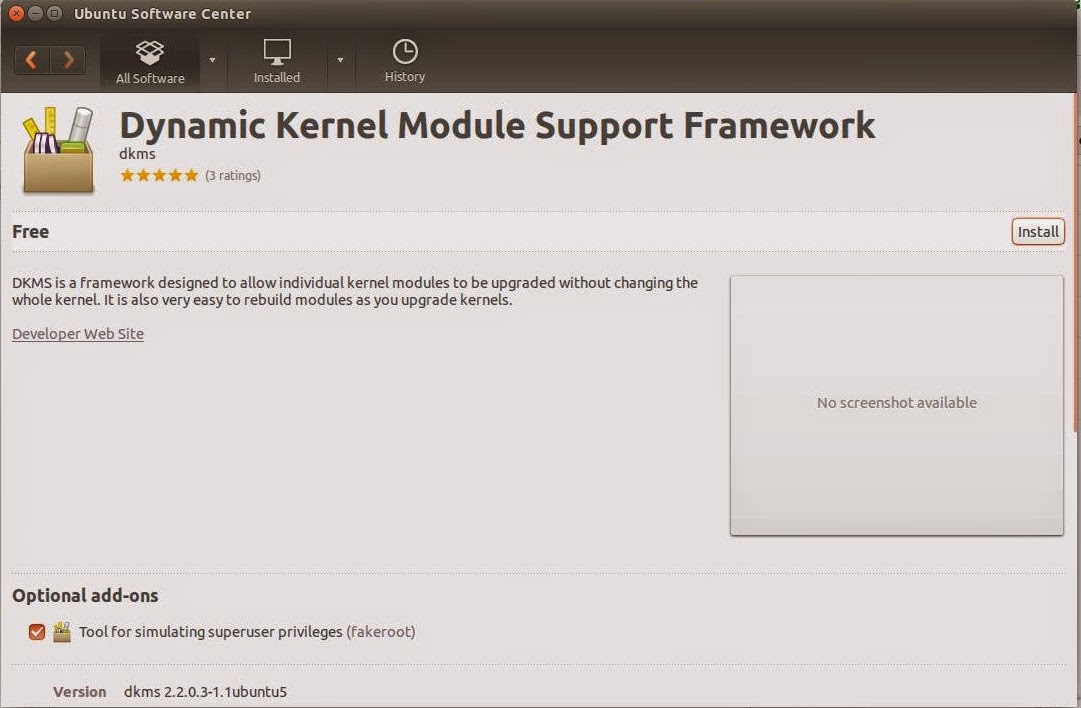
2 sudo apt-get install dkms

3 sudo /etc/init.d/vboxdrv setup 

or 

Dynamic kernel Module Support Framework 

Thanking you
Hope U Like it.....

CloudNetwork: Checkout How to Resolve Kernel Driver not Installed(rc>1908) in Ubuntu 14.04.

Oracle Linux 7

Fedora 20 in Virtual box

Nagios 4.0.7

Roboform in linux

Ubuntu server 12.04
Zimbra Desktop 7

What is Iptables & How to Implement on Linux

September 02, 2014
What is Iptables & How to Implement on Linux
Iptables

How To Start iptables
You can start, stop, and restart iptables after booting by using the commands:
[root@bigboy tmp]# service iptables start
[root@bigboy tmp]# service iptables stop
[root@bigboy tmp]# service iptables restart
To get iptables configured to start at boot, use the chkconfig command:.
[root@bigboy tmp]# chkconfig iptables on

Determining The Status of iptables
You can determine whether iptables is running or not via the service iptables status command. Fedora Core will give a simple status message. For example
[root@bigboy tmp]# service iptables status
Firewall is stopped.
[root@bigboy tmp]#

Table 14-1 Processing For Packets Routed By The Firewall
Queue Type
Queue Function
Packet Transformation Chain in Queue
Chain Function
Filter Packet filtering FORWARD Filters packets to servers accessible by another NIC on the firewall.
INPUT Filters packets destined to the firewall.
OUTPUT Filters packets originating from the firewall
Nat Network Address Translation PREROUTING Address translation occurs before routing. Facilitates the transformation of the destination IP address to be compatible with the firewall's routing table. Used with NAT of the destination IP address, also known as destination NAT or DNAT.
POSTROUTING Address translation occurs after routing. This implies that there was no need to modify the destination IP address of the packet as in pre-routing. Used with NAT of the source IP address using either one-to-one or many-to-one NAT. This is known as source NAT, or SNAT.
OUTPUT Network address translation for packets generated by the firewall. (Rarely used in SOHO environments)
Mangle TCP header modification
PREROUTING
POSTROUTING
OUTPUT
INPUT
FORWARD
Modification of the TCP packet quality of service bits before routing occurs. (Rarely used in SOHO environments)

Targets And Jumps
target
Desciption
Most Common Options
ACCEPT
  • iptables stops further processing.
  • The packet is handed over to the end application or the operating system for processing
N/A
DROP
  • iptables stops further processing.
  • The packet is blocked
N/A
LOG
  • The packet information is sent to the syslog daemon for logging
  • iptables continues processing with the next rule in the table
  • As you can't log and drop at the same time, it is common to have two similar rules in sequence. The first will log the packet, the second will drop it.
--log-prefix "string"
Tells iptables to prefix all log messages with a user defined string. Frequently used to tell why the logged packet was dropped
REJECT
  • Works like the DROP target, but will also return an error message to the host sending the packet that the packet was blocked
--reject-with qualifier
The qualifier tells what type of reject message is returned. Qualifiers include:
icmp-port-unreachable (default)
icmp-net-unreachable
icmp-host-unreachable
icmp-proto-unreachable
icmp-net-prohibited
icmp-host-prohibited
tcp-reset
echo-reply
DNAT
  • Used to do destination network address translation. ie. rewriting the destination IP address of the packet
--to-destination ipaddress
Tells iptables what the destination IP address should be
SNAT
  • Used to do source network address translation rewriting the source IP address of the packet
  • The source IP address is user defined
--to-source <address>[-<address>][:<port>-<port>]
Specifies the source IP address and ports to be used by SNAT.
MASQUERADE
  • Used to do Source Network Address Translation.
  • By default the source IP address is the same as that used by the firewall's interface
[--to-ports <port>[-<port>]]
Specifies the range of source ports to which the original source port can be mapped.

Table 14-2 General Iptables Match Criteria
iptables command Switch
Desciption
-t <-table-> If you don't specify a table, then the filter table is assumed. As discussed before, the possible built-in tables include: filter, nat, mangle
-j <target> Jump to the specified target chain when the packet matches the current rule.
-A Append rule to end of a chain
-F Flush. Deletes all the rules in the selected table
-p <protocol-type> Match protocol. Types include, icmp, tcp, udp, and all
-s <ip-address> Match source IP address
-d <ip-address> Match destination IP address
-i <interface-name> Match "input" interface on which the packet enters.
-o <interface-name> Match "output" interface on which the packet exits

In this command switches example
iptables -A INPUT -s 0/0 -i eth0 -d 192.168.1.1 -p TCP -j ACCEPT
iptables is being configured to allow the firewall to accept TCP packets coming in on interface eth0 from any IP address destined for the firewall's IP address of 192.168.1.1. The 0/0 representation of an IP address means any.

In this example:
iptables -A FORWARD -s 0/0 -i eth0 -d 192.168.1.58 -o eth1 -p TCP \

In this example:

iptables -A OUTPUT -p icmp --icmp-type echo-request -j ACCEPT

iptables -A INPUT -p tcp --syn -m limit --limit 5/s -i eth0 -j ACCEPT

This is an expansion on the previous example:
iptables -A FORWARD -s 0/0 -i eth0 -d 192.168.1.58 -o eth1 -p TCP \ --sport 1024:65535 -m multiport --dports 80,443 -j ACCEPT iptables -A FORWARD -d 0/0 -o eth0 -s 192.168.1.58 -i eth1 -p TCP \ -m state --state ESTABLISHED -j ACCEPT
Using User Defined Chains

iptables -A INPUT -i eth0 -d 206.229.110.2 -j fast-input-queue
iptables -A OUTPUT -o eth0 -s 206.229.110.2 -j fast-output-queue

iptables -A fast-input-queue -p icmp -j icmp-queue-in
iptables -A fast-output-queue -p icmp -j icmp-queue-out

iptables -A icmp-queue-out -p icmp --icmp-type echo-request \
-m state --state NEW -j ACCEPT

Custom Queues Example Listing
Chain
Desciption
INPUT The regular built-in INPUT chain in iptables
OUTPUT The regular built-in OUTPUT chain in iptables
fast-input-queue Input chain dedicated to identifying specific protocols and shunting the packets to protocol specific chains.
fast-output-queue Output chain dedicated to identifying specific protocols and shunting the packets to protocol specific chains.
icmp-queue-out Output queue dedicated to ICMP
icmp-queue-in Input queue dedicated to ICMP

Saving Your iptables Scripts

[root@bigboy tmp]# cat /etc/sysconfig/iptables
# Generated by iptables-save v1.2.9 on Mon Nov 8 11:00:07 2004
*filter
:INPUT ACCEPT [0:0]
:FORWARD ACCEPT [0:0]
:OUTPUT ACCEPT [144:12748]
:RH-Firewall-1-INPUT - [0:0]
-A INPUT -j RH-Firewall-1-INPUT
-A FORWARD -j RH-Firewall-1-INPUT
-A RH-Firewall-1-INPUT -i lo -j ACCEPT
-A RH-Firewall-1-INPUT -p icmp -m icmp --icmp-type 255 -j ACCEPT
-A RH-Firewall-1-INPUT -p esp -j ACCEPT
-A RH-Firewall-1-INPUT -p ah -j ACCEPT
-A RH-Firewall-1-INPUT -m state --state RELATED,ESTABLISHED -j ACCEPT
-A RH-Firewall-1-INPUT -p tcp -m state --state NEW -m tcp --dport 22 -j ACCEPT
-A RH-Firewall-1-INPUT -j REJECT --reject-with icmp-host-prohibited
COMMIT
# Completed on Mon Nov 8 11:00:07 2004
This example exports the iptables-save output to a text file named firewall-config.
[root@bigboy tmp]# iptables-save > firewall-config 
[root@bigboy tmp]# cat firewall-config 
                              # Generated by iptables-save v1.2.9 on Mon Nov 8 11:00:07 2004 *filter :INPUT ACCEPT [0:0] :FORWARD ACCEPT [0:0] :OUTPUT ACCEPT [144:12748] :RH-Firewall-1-INPUT - [0:0] -A INPUT -j RH-Firewall-1-INPUT -A FORWARD -j RH-Firewall-1-INPUT -A RH-Firewall-1-INPUT -i lo -j ACCEPT -A RH-Firewall-1-INPUT -p icmp -m icmp --icmp-type 255 -j ACCEPT -A RH-Firewall-1-INPUT -p esp -j ACCEPT -A RH-Firewall-1-INPUT -p ah -j ACCEPT -A RH-Firewall-1-INPUT -m state --state RELATED,ESTABLISHED -j ACCEPT -A RH-Firewall-1-INPUT -p tcp -m state --state NEW -m tcp --dport 22 -j ACCEPT -A RH-Firewall-1-INPUT -j REJECT --reject-with icmp-host-prohibited COMMIT 
[root@bigboy tmp]# iptables-restore < firewall-config
Finally, you should permanently save the active configuration so that it will be loaded automatically when the system reboots:
[root@bigboy tmp]# service iptables save

Loading Kernel Modules Needed By iptables
# File: /etc/rc.local

# Module to track the state of connections
modprobe ip_conntrack

# Load the iptables active FTP module, requires ip_conntrack
modprobe ip_conntrack_ftp
# Load iptables NAT module when required
modprobe iptable_nat
# Module required for active an FTP server using NAT

Allowing DNS Access To Your Firewall
You'll almost certainly want your firewall to make DNS queries to the Internet. This is not because it is required for the basic functionality of the firewall, but because of Fedora Linux's yum RPM updater which will help to keep the server up to date with the latest security patches. The following statements will apply not only for firewalls acting as DNS clients but also for firewalls working in a caching or regular DNS server role.
#---------------------------------------------------------------
# Allow outbound DNS queries from the FW and the replies too
#
# - Interface eth0 is the internet interface
#
# Zone transfers use TCP and not UDP. Most home networks
# / websites using a single DNS server won't require TCP statements
#
#---------------------------------------------------------------
iptables -A OUTPUT -p udp -o eth0 --dport 53 --sport 1024:65535 \
-j ACCEPT
iptables -A INPUT -p udp -i eth0 --sport 53 --dport 1024:65535 \

Allowing WWW And SSH Access To Your Firewall
This sample snippet is for a firewall that doubles as a web server that is managed remotely by its system administrator via secure shell (SSH) sessions. Inbound packets destined for ports 80 and 22 are allowed thereby making the first steps in establishing a connection. It isn't necessary to specify these ports for the return leg as outbound packets for all established connections are allowed. Connections initiated by persons logged into the Web server will be denied as outbound NEW connection packets aren't allowed.
#--------------------------------------------------------------- # Allow previously established connections # - Interface eth0 is the internet interface #--------------------------------------------------------------- iptables -A OUTPUT -o eth0 -m state --state ESTABLISHED,RELATED \ -j ACCEPT #--------------------------------------------------------------- # Allow port 80 (www) and 22 (SSH) connections to the firewall #--------------------------------------------------------------- iptables -A INPUT -p tcp -i eth0 --dport 22 --sport 1024:65535 \ -m state --state NEW -j ACCEPT iptables -A INPUT -p tcp -i eth0 --dport 80 --sport 1024:65535 \ -m state --state NEW -j ACCEPT
Allowing Your Firewall To Access The Internet
This iptables script enables a user on the firewall to use a Web browser to surf the Internet. HTTP traffic uses TCP port 80, and HTTPS uses port 443.
Note: HTTPS (secure HTTP) is used for credit card transactions frequently, as well as by RedHat Linux servers running up2date. FTP and HTTP are frequently used with yum.
#--------------------------------------------------------------- # Allow port 80 (www) and 443 (https) connections from the firewall #--------------------------------------------------------------- iptables -A OUTPUT -j ACCEPT -m state \ --state NEW,ESTABLISHED,RELATED -o eth0 -p tcp \ -m multiport --dports 80,443 --sport 1024:65535 #--------------------------------------------------------------- # Allow previously established connections # - Interface eth0 is the internet interface #--------------------------------------------------------------- iptables -A INPUT -j ACCEPT -m state --state ESTABLISHED,RELATED \ -i eth0 -p tcp
If you want all TCP traffic originating from the firewall to be accepted, then remove the line:
-m multiport --dports 80,443 --sport 1024:65535
Allow Your Home Network To Access The Firewall
In this example, eth1 is directly connected to a home network using IP addresses from the 192.168.1.0 network. All traffic between this network and the firewall is simplistically assumed to be trusted and allowed.
Further rules will be needed for the interface connected to the Internet to allow only specific ports, types of connections and possibly even remote servers to have access to your firewall and home network.
#--------------------------------------------------------------- # Allow all bidirectional traffic from your firewall to the # protected network # - Interface eth1 is the private network interface #--------------------------------------------------------------- iptables -A INPUT -j ACCEPT -p all -s 192.168.1.0/24 -i eth1 iptables -A OUTPUT -j ACCEPT -p all -d 192.168.1.0/24 -o eth1
Checking The Firewall Logs

#---------------------------------------------------------------
# Log and drop all other packets to file /var/log/messages
# Without this we could be crawling around in the dark
#---------------------------------------------------------------
iptables -A OUTPUT -j LOG
iptables -A INPUT -j LOG
iptables -A FORWARD -j LOG
iptables -A OUTPUT -j DROP
iptables -A INPUT -j DROP
iptables -A FORWARD -j DROP

iptables Won't Start

oot@bigboy tmp]# service iptables start
[root@bigboy tmp]#

[root@bigboy tmp]# touch /etc/sysconfig/iptables
[root@bigboy tmp]# chmod 600 /etc/sysconfig/iptables

[root@bigboy tmp]# service iptables start
Applying iptables firewall rules: [ OK ]
[root@bigboy tmp]#

Here are some examples of the output of this file:
  • Firewall denies replies to DNS queries (UDP port 53) destined to server 192.168.1.102 on the home network.
Feb 23 20:33:50 bigboy kernel: IN=wlan0 OUT= MAC=00:06:25:09:69:80:00:a0:c5:e1:3e:88:08:00 SRC=192.42.93.30 DST=192.168.1.102 LEN=220 TOS=0x00 PREC=0x00 TTL=54 ID=30485 PROTO=UDP SPT=53 DPT=32820 LEN=200
  • Firewall denies Windows NetBIOS traffic (UDP port 138)
Feb 23 20:43:08 bigboy kernel: IN=wlan0 OUT= MAC=ff:ff:ff:ff:ff:ff:00:06:25:09:6a:b5:08:00 SRC=192.168.1.100 DST=192.168.1.255 LEN=241 TOS=0x00 PREC=0x00 TTL=64 ID=0 DF PROTO=UDP SPT=138 DPT=138 LEN=221
  • Firewall denies Network Time Protocol (NTP UDP port 123)
Feb 23 20:58:48 bigboy kernel: IN= OUT=wlan0 SRC=192.168.1.102 DST=207.200.81.113 LEN=76 TOS=0x10 PREC=0x00 TTL=64 ID=0 DF PROTO=UDP SPT=123 DPT=123 LEN=56

-j ACCEPT

modprobe ip_nat_ftp

[root@bigboy tmp]#


iptables -A icmp-queue-in -p icmp --icmp-type echo-reply -j ACCEPT


iptables -A INPUT -p icmp --icmp-type echo-reply -j ACCEPT

iptables is being configured to allow the firewall to send ICMP echo-requests (pings) and in turn, accept the expected ICMP echo-replies.
Consider another example
iptables -A INPUT -p icmp --icmp-type echo-request \ -m limit --limit 1/s -i eth0 -j ACCEPT
--sport 1024:65535 --dport 80 -j ACCEPT


###IPTables###
Features:
 1. Firewall for Linux
 2. Interface to Netfilter, which is loaded by the kernel
 3. Operates primarily @ layers 3 & 4 of the OSI model
 4. Modular
 5. Provides Network Address Translation (NAT)
 6. IPTables can also access other layers (2, 5-7), with modules

1. grep -i config_netfilter /boot/config*

Note: Save rules in: /etc/sysconfig/iptables so that when IPTables is restarted, the rules will be applied OR, update /etc/sysconfig/iptables-config to save the rules automatically

/sbin/iptables - primary ACL modifier utility
/sbin/iptables-restore - restores rules to current IPTables instance
/sbin/iptables-save - saves rules to STDOUT, by default, or to a file


IPTables includes 3 default tables, which you cannot remove:
 1. NAT
 2. Mangle
 3. Filter (Default) - filters inbound/outbound traffic

Note: Each table, includes chains, which include Access Control Entries (ACEs)

Usage:
 1. iptables -L

Note: The Filter table includes 3 chains:
 1. INPUT - applies to traffic destined to a service that our system is bound to

 2. FORWARD - applies to traffic being routed through the system

 3. OUTPUT - applies to traffic sourced from our system, heading outbound


Tasks:
 1. Filter inbound traffic to remote RH5 system to SSH
  a. iptables -A INPUT -p tcp --dport 22 -j ACCEPT
  b. iptables -A INPUT -j DROP

 2. Filter outbound traffic to ANY remote SSH port
  a. iptables -A OUTPUT -p tcp --dport 22 -j DROP

 3. Flush ALL rules from OUTPUT chain of the Filter table 
  a. iptables -F OUTPUT

 4. Save rules to file, then flush rules
  a. iptables-save > iptables.rules.1

 5. Reinstate flushed rules
  a. iptables-restore iptables.rules.1


###IPv6 IPTables###
Features:
 1. Firewall for IPv6

/etc/rc.d/init.d/ip6tables - run-script
/etc/sysconfig/ip6tables-config - system-wide config file

/sbin/ip6tables - primary tool for administering IP6Tables
/sbin/ip6tables-restore
/sbin/ip6tables-save

 2. Maintains 3 default tables:
  a. Filter - matches IPTables(IPv4)
  b. Mangle - matches IPTables(IPv4)
  c. Raw

 
Usage:
 1. ip6tables -L

Note: IPv6 firewall rules are administered independently of IPv4 rules

Tasks:
1. Filter inbound traffic to remote RH5 system to SSH
  a. ip6tables -A INPUT -p tcp --dport 22 -j ACCEPT
  b. ip6tables -A INPUT -j DROP

 2. Filter outbound traffic to ANY remote SSH port
  a. ip6tables -A OUTPUT -p tcp --dport 22 -j DROP

 3. Flush ALL rules from OUTPUT chain of the Filter table 
  a. ip6tables -F OUTPUT

 4. Save rules to file, then flush rules
  a. ip6tables-save > ip6tables.rules.1

 5. Reinstate flushed rules
  a. ip6tables-restore ip6tables.rules.1

Thanking you
Hope U Like it.......

Fedora 20 in Virtual box

Roboform in linux

Ubuntu server 12.04

Nagios 4.0.7

Oracle Linux 7
Free BSD 10

How to Use the vi Editor and What is vi Editior?

September 02, 2014
How to Use the vi Editor and What is vi Editior?
vi - text Editor

The vi editor is available on almost all Unix systems. vi can be used from any type of terminal because it does not depend on arrow keys and function keys--it uses the standard alphabetic keys for commands.
vi (pronounced "vee-eye") is short for "vi"sual editor. It displays a window into the file being edited that shows 24 lines of text. vi is a text editor, not a "what you see is what you get" word processor. vi lets you add, change, and delete text, but does not provide such formatting capabilities as centring lines or indenting. paragraphs.
This help note explains the basics of vi:
  • opening and closing a file
  • moving around in a file
  • elementary editing
vi has many other commands and options not described here. The following resources can help you get started using the vi editor, and are available at the UW University Book Store:
  • "vi Tutorial." Specialized Systems Consultants (SSC).
  • "vi Reference." Specialized Systems Consultants (SSC).
  • "Learning the vi Editor." Linda Lamb, 1990.

Starting vi

You may use vi to open an already existing file by typing
vi filename
where "filename" is the name of the existing file. If the file is not in your current directory, you must use the full pathname.
Or you may create a new file by typing
vi newname
where "newname" is the name you wish to give the new file.
To open a new file called "testvi," enter
vi testvi
On-screen, you will see blank lines, each with a tilde (~) at the left, and a line at the bottom giving the name and status of the new file:
~
"testvi" [New file]

vi Modes

vi has two modes:
  • command mode
  • insert mode
In command mode, the letters of the keyboard perform editing functions (like moving the cursor, deleting text, etc.). To enter command mode, press the escape <Esc> key.
In insert mode, the letters you type form words and sentences. Unlike many word processors, vi starts up in command mode.

Entering Text

In order to begin entering text in this empty file, you must change from command mode to insert mode. To do this, type
i
Nothing appears to change, but you are now in insert mode and can begin typing text. In general, vi's commands do not display on the screen and do not require the Return key to be pressed.
Type a few short lines and press <Return> at the end of each line. If you type a long line, you will notice the vi does not word wrap, it merely breaks the line unceremoniously at the edge of the screen.
If you make a mistake, pressing <Backspace> or <Delete> may remove the error, depending on your terminal type.

Moving the Cursor

To move the cursor to another position, you must be in command mode. If you have just finished typing text, you are still in insert mode. Go back to command mode by pressing <Esc>. If you are not sure which mode you are in, press <Esc> once or twice until you hear a beep. When you hear the beep, you are in command mode.
The cursor is controlled with four keys: h, j, k, l.
Key Cursor Movement
--- ---------------
h left one space
j down one line
k up one line
l right one space
When you have gone as far as possible in one direction, the cursor stops moving and you hear a beep. For example, you cannot use l to move right and wrap around to the next line, you must use j to move down a line. See the section entitled "Moving Around in a File" for ways to move more quickly through a file.

Basic Editing

Editing commands require that you be command mode. Many of the editing commands have a different function depending on whether they are typed as upper- or lowercase. Often, editing commands can be preceded by a number to indicate a repetition of the command.

Deleting Characters

To delete a character from a file, move the cursor until it is on the incorrect letter, then type
x
The character under the cursor disappears. To remove four characters (the one under the cursor and the next three) type
4x
To delete the character before the cursor, type
X (uppercase)

Deleting Words

To delete a word, move the cursor to the first letter of the word, and type
dw
This command deletes the word and the space following it.
To delete three words type
3dw

Deleting Lines

To delete a whole line, type
dd
The cursor does not have to be at the beginning of the line. Typing dd deletes the entire line containing the cursor and places the cursor at the start of the next line. To delete two lines, type
2dd
To delete from the cursor position to the end of the line, type
D (uppercase)

Replacing Characters

To replace one character with another:
  1. Move the cursor to the character to be replaced.
  2. Type r
  3. Type the replacement character.
The new character will appear, and you will still be in command mode.

Replacing Words

To replace one word with another, move to the start of the incorrect word and type
cw
The last letter of the word to be replaced will turn into a $. You are now in insert mode and may type the replacement. The new text does not need to be the same length as the original. Press <Esc> to get back to command mode. To replace three words, type
3cw

Replacing Lines

To change text from the cursor position to the end of the line:
  1. Type C (uppercase).
  2. Type the replacement text.
  3. Press <Esc>.

Inserting Text

To insert text in a line:
  1. Position the cursor where the new text should go.
  2. Type i
  3. Enter the new text.
The text is inserted BEFORE the cursor.
4. Press <Esc> to get back to command mode.

Appending Text

To add text to the end of a line:
  1. Position the cursor on the last letter of the line.
  2. Type a
  3. Enter the new text.
This adds text AFTER the cursor.
4. Press <Esc> to get back to command mode.

Opening a Blank Line

To insert a blank line below the current line, type (lowercase)
To insert a blank line above the current line, type O (uppercase)

Joining Lines

To join two lines together:
  1. Put the cursor on the first line to be joined.
  2. Type J
To join three lines together:
  1. Put the cursor on the first line to be joined.
  2. Type 3J

Undoing

To undo your most recent edit, type  U
To undo all the edits on a single line, type U (uppercase)
Undoing all edits on a single line only works as long as the cursor stays on that line. Once you move the cursor off a line, you cannot use U to restore the line.

Moving Around in a File

There are shortcuts to move more quickly though a file. All these work in command mode.
Key Movement
--- --------
w forward word by word
b backward word by word
$ to end of line
0 (zero) to beginning of line
H to top line of screen
M to middle line of screen
L to last line of screen
G to last line of file
1G to first line of file
<Control>f scroll forward one screen
<Control>b scroll backward one screen
<Control>d scroll down one-half screen
<Control>u scroll up one-half screen

Moving by Searching

To move quickly by searching for text, while in command mode:
  1. Type / (slash).
  2. Enter the text to search for.
  3. Press <Return>.
The cursor moves to the first occurrence of that text.
To repeat the search in a forward direction, type  N
To repeat the search in a backward direction, type  N

Closing and Saving a File

With vi, you edit a copy of the file, rather than the original file. Changes are made to the original only when you save your edits.
To save the file and quit vi, type  ZZ
The vi editor editor is built on an earler Unix text editor called ex. ex commands can be used within vi. ex commands begin with a : (colon) and end with a <Return>. The command is displayed on the status line as you type. Some ex commands are useful when saving and closing files.
To save the edits you have made, but leave vi running and your file open:
  1. Press <Esc>.
  2. Type :w
  3. Press <Return>.
To quit vi, and discard any changes your have made since last saving:
  1. Press <Esc>.
  2. Type :q!
  3. Press <Return>.

Command Summary

STARTING vi
vi filename edit a file named "filename"
vi newfile create a new file named "newfile"
ENTERING TEXT
i insert text left of cursor
a append text right of cursor
MOVING THE CURSOR
h left one space
j down one line
k up one line
l right one space
BASIC EDITING
x delete character
nx delete n characters
X delete character before cursor
dw delete word
ndw delete n words
dd delete line
ndd delete n lines
D delete characters from cursor to end of line
r replace character under cursor
cw replace a word
ncw replace n words
C change text from cursor to end of line
o insert blank line below cursor
(ready for insertion)
O insert blank line above cursor
(ready for insertion)
J join succeeding line to current cursor line
nJ join n succeeding lines to current cursor line
u undo last change
U restore current line
MOVING AROUND IN A FILE
w forward word by word
b backward word by word
$ to end of line
0 (zero) to beginning of line
H to top line of screen
M to middle line of screen
L to last line of screen
G to last line of file
1G to first line of file
<Control>f scroll forward one screen
<Control>b scroll backward one screen
<Control>d scroll down one-half screen
<Control>u scroll up one-half screen
n repeat last search in same direction
N repeat last search in opposite direction
CLOSING AND SAVING A FILE
ZZ save file and then quit
:w save file
:q! discard changes and quit file


Thanking You
Hope U Like it.....


Ubuntu 14.04

Linux Mint 17

Ubuntu Root Password Reset

Lamp in Ubuntu 14.04

Redhat Linux 7 server
Gentoo Linux 12.1