Cloud Network

Networking | Support | Tricks | Troubleshoot | Tips

Buymecoffe

Buy Me A Coffee

Thursday, September 18, 2014

How to Install & Configure Zimbra Desktop 7.2.5 in Windows 7

September 18, 2014
How to Install & Configure Zimbra Desktop 7.2.5 in Windows 7
Install & Configure Zimbra Desktop 7.2.5


Hello Everyone,

In this tutorial, Let us Install & Configure Zimbra 7.2.5 Desktop on
Window 7.

You Can Install Zimbra in
Operating System :- Windows 8, Windows 7 and Windows Vista.
Processor :- 32 Bit and 64 Bit both Can Support

Requirement :-
Step1 :- At least 200MB free disk space is required to
install the software.

Step2 :- Additional 512MB free memory is required to run
Zimbra Desktop

You Can Download Zimbra Desktop 7.2.5 :-
Step3 :- http://www.zimbra.com/downloads/zimbr...

After Installation Need to Configure in GMAIL
Login into Gmail Account and Set the IMAP Enable
Step4 :- Enable IMAP in Setting

Step5 :- Then Click On Google Plus - Go to Security then Enable the Access to Low, Save and Exit


NOTE :- For Any Clarification Please Comment Below

Watch Next Video :- How to install Ubuntu 14.04

https://www.youtube.com/watch?
v=QkJmahizwO4&list=TLFuFUUOL3YmsshiR­7O5nLXmuJZMr
OsuZd


Thanking You
Hope U Like it........

Windows Server 2008

Orientdb NoSQL part2

Python 3.4.1

Install OrientDB Document Graph

Netbeans IDE
Vtiger CRM Database

Monday, September 15, 2014

How to install Fedora 20 on Virtual Box

September 15, 2014
How to install Fedora 20 on Virtual Box
Install Fedora 20 in Virtual Box
Hello Everyone,

How to Install Fedora 20 (Latest Version) on Virtual Box.

Step1:- First Download Virtual box setup below is this link to download
https://www.virtualbox.org/wiki/Downloads

select -- VirtualBox 4.3.12 for Windows hosts 32 bit.

Step2:- See My Video How to Install Virtual Box...
http://www.youtube.com/watch?v=__l_lhcwxwk&list=TLmAZSxgVjfkOZs3nwQ9awKvuY7sIlHzfu

Step3:- Download ISO Image of Fedora 20 ..
http://fedoraproject.org/get-fedora
size - 935MB.

For remaining installation please Keep watching my video

PLEASE REMEMBER USERNAME & PASSWORD During Insallation of Fedora 20

if you Forget username or password or then you can reset by watching below video.....

How to Reset Root Password --- https://www.youtube.com/watch?v=oikxjjYH7rI&list=PLmMAzSMza_1f4b8Keim51-9LfKBU28pWf


NOTE :- For Any Clarification Please Comment Below

Watch Next Video :- see How to Install Ubuntu Desktop 14.04 LTS

https://www.youtube.com/watch?v=PiKchOXHwpE&list=PLmMAzSMza_1f4b8Keim51-9LfKBU28pWf


Thanking you
Hope U Like it.....


<h1 style="display:none">Ubuntu 14.04</h1>
<h2 style="display:none">Linux Mint 17</h2>
<h3 style="display:none">Python</h3>
<h4 style="display:none">Nagios</h4>
<h5 style="display:none">Oracle Linux 7</h5>

Own Website

Vtiger Open Source Database

Install Vtiger CRM

Tortoise installation SVN

Notepad++ install
Ubuntu Server 12.04

Wednesday, September 10, 2014

How to install Oracle Linux 7 on Virtual Box

September 10, 2014
How to install Oracle Linux 7 on Virtual Box

Hello Everyone,

In this tutorial,

Let us Install Oracle Linux 7 in Virtual Box with Full Screen Resolution  --  64 Bit

You Can also Install in VMware Workstation 11 or Microsoft Hyper-V.

Minimum System Requirements
1.  x86-64 CPU (64-bit Macs, with an Intel Core 2 Duo, Intel Core i3, Intel Core i5, Intel Core i7, or Xeon processor).
2GB of System Memory (RAM).
3. 20GB of Disk Space(Hard Disk).
4. Graphics Card and Display capable of at least 1024x768.
5. Either a CD/DVD drive or a USB port for the installer media.
6. Internet Access.

Step1:- First Download Virtual box setup below is this link to download 
Or
Another Link to Download Virtual Box

Select -- Virtual Box 4.3.X for Windows hosts 32 or 64 bit.   
(Where 'X' is the Latest Version)

Step2:- See My Video How to Install virtual box... Click Below link

Step 3 :- Download ISO Images of Oracle Linux 7 by Clicking Below Link

Step 4 :- Just Check the Box of  (Accept License Agreement)
and then Click on --- OracleLinux-R7-U0-Server-x86_64-dvd.iso (3,826,253,824 bytes)  --- Download.

You Need to Create a New Account After Regsiter you Can Download it

Follow Instruction in My Video to See How to Install

For Full Screen Resolution….
Step4 :- sudo apt-get install virtualbox-guest-dkms virtualbox-guest-utils virtualbox-guest-x11                or
Step5 :- sudo apt-get install virtualbox-guest-dkms
Restart the VM and enjoy screen-size.

Mount the Guest Additions by selecting Devices --- Insert Guest Additions CD image… (or you can press Host + D)
Step6 :- run the VBoxLinuxAdditions.run script within the newly mounted cd
              or  sh VBoxLinuxAdditions.sh

NOTE :- For Any Clarification Please Below

Comment,
Like and
Share  us  and  help us to spread.

####--------------------------------------------------------------------------------------####
Website    :-   http://www.cloudnetwork.in
Twitter     :-   http://twitter.com/itcloudnet
Skype Id  :-   cloud.network1
E-Mail Id :-   itcloudnet@gmail.com
####----------------------------------------------------------------------------------------####                         
Thanking You
Hope U Like it........

Friday, September 5, 2014

How Many Port Numbers are there in Linux and Ubuntu

September 05, 2014
How Many Port Numbers are there in Linux and Ubuntu
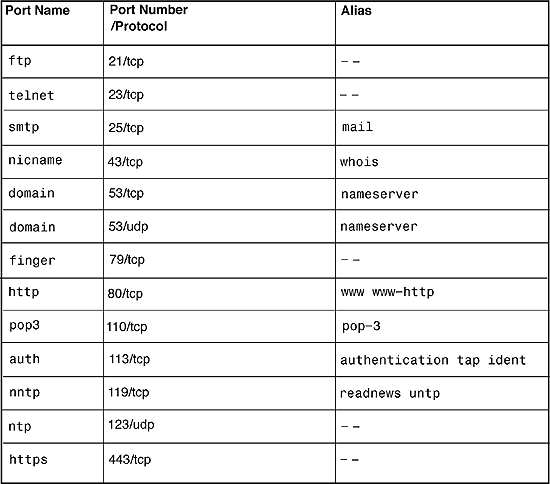
Port Numbers
Every computer or device on the Internet must have a unique number assigned to it called the IP address. This IP address is used to recognize your particular computer out of the millions of other computers connected to the Internet. When information is sent over the Internet to your computer how does your computer accept that information? It accepts that information by using TCP or UDP ports.


21 => FTP
22 => SSH
23 => Telnet
25 => SMTP Mail Transfer
43 => WHO IS Service
53 => name server (DNS)
80 => HTTP (Web server)
110 => POP protocol pop3 (for email)
995 => POP over SSL
3306 => MySQL Server
111 => rpcbind
953 => rndc
143 => IMAP Protocol (for email)
993 => IMAP Secure
443 => HTTP Secure
3128 => Squid Proxy
3306 => MysQL Server
3636 => Piranha
4643 => Virtuosso Power Panel
10000 => Webmin


Thanking You
Hope U Like it......


Ubuntu 14.04

Lamp Installation in Ubuntu

Root Password Reset in Ubuntu

Linux Mint 17

Own Blogger Website
Install Free BSD

What is POSTFIX and How it Works in Linux Server

September 05, 2014
What is POSTFIX and How it Works in Linux Server
PostFix Mail
###Squid Proxy Server###
 Features:
  1. Caching server
  2. Filters access to the Net
  3. Efficient bandwidth usage
  4. Supports a wide criteria of ACLs (dstdomain, src_IP, Time of day, etc.)

Tasks:
 1. Install Squid Proxy server
  a. yum -y install squid

/etc/squid - primary configuration container
/etc/squid/squid.conf - primary configuration file
/usr/sbin/squidclient - used to test Squid Proxy server
/var/log/squid - primary log directory
/var/spool/squid - cache directory containter

 2. Start Squid, and ensure that it starts when the system reboots
  a. service squid start
  b. chkconfig --level 35 squid on

Note: Ensure that ample/fast disk storage is available for: /var/spool/squid
Note: Squid defaults to TCP:3128

 3. Configure Firefox browser to use Squid Proxy server
 
 4. Configure Squid to allow LAN access through, to resources
  a. nano /etc/squid/squid.conf
  b. acl lan_users src 192.168.75.0/24
  c. http_access allow lan_users

 5. Deny 192.168.75.10, but allow ALL other users from the local subnet
  a.
acl_lan_bad_users src 192.168.75.10
http_access deny acl_lan_bad_users

Thanking You
Hope U Like it...

<h1 style="display:none">Squid Proxy Server</h1>
<h2 style="display:none">Linux Mint 17</h2>
<h3 style="display:none">Python</h3>
<h4 style="display:none">Squid Proxy</h4>
<h5 style="display:none">Oracle Linux 7</h5>

What is Proxy Server and How it works ?

September 05, 2014
What is Proxy Server and How it works ?
Proxy Server

###Squid Proxy Server###
 Features:
  1. Caching server
  2. Filters access to the Net
  3. Efficient bandwidth usage
  4. Supports a wide criteria of ACLs (dstdomain, src_IP, Time of day, etc.)

Tasks:
 1. Install Squid Proxy server
  a. yum -y install squid

/etc/squid - primary configuration container
/etc/squid/squid.conf - primary configuration file
/usr/sbin/squidclient - used to test Squid Proxy server
/var/log/squid - primary log directory
/var/spool/squid - cache directory containter

 2. Start Squid, and ensure that it starts when the system reboots
  a. service squid start
  b. chkconfig --level 35 squid on

Note: Ensure that ample/fast disk storage is available for: /var/spool/squid
Note: Squid defaults to TCP:3128 

 3. Configure Firefox browser to use Squid Proxy server
 
 4. Configure Squid to allow LAN access through, to resources
  a. nano /etc/squid/squid.conf
  b. acl lan_users src 192.168.75.0/24
  c. http_access allow lan_users

 5. Deny 192.168.75.10, but allow ALL other users from the local subnet
  a. 
acl_lan_bad_users src 192.168.75.10
http_access deny acl_lan_bad_users

Thanking You
Hope U Like it.......

Ubuntu 14.04

Linux Mint 17

Python

Nagios

Oracle Linux 7
Reset Root Password

How to Create RAID in Linux

September 05, 2014
How to Create RAID in Linux
RAID
###RAID###
Features:
 1. The ability to increase availability and reliability of data
      (originally redundant array of inexpensive disks; now commonly redundant array of independent disks)
Tasks:
 1. Create a RAID-1 Device (/dev/md0..n)
  a. fdisk /dev/sdb - to create usable raw partitions
  b. partprobe /dev/sdb - to force a kernel update of the partition layout of the      disk: /dev/sdb
  b. mdadm --create /dev/md0 --level=1 --raid-devices=2 /dev/sdb5 /dev/sdb6
  c. cat /proc/mdstat - lists active RAID (md) information
  d. mke2fs -j /dev/md0 - overlays a file system on the RAID device
  e. mount /dev/md0 /raid1
  f. update: /etc/fstab

Note: use 'mdadm --query /dev/md0' to get information about a RAID device

Note: You may create RAID volumes/devices on a single or on multiple disks
Ideally, your RAID volumes should span multiple physical disks to improve:
 a. reliability
 b. performance
 c. availability

 2. Remove the RAID-1 device
 a. umount /dev/md0
 b. mdadm --manage --stop /dev/md0

 3. Create a RAID-5 Volume
 a. fdisk /dev/sdb - to create a partition number 7
 b. partprobe /dev/sdb - to update the kernel's view of the partition table
 c. mdadm --create /dev/md0 --level=5 --raid-devices=3 /dev/sdb5 /dev/sdb6 /dev/sdb7
 d. watch cat /proc/mdstat - refreshes every 2 seconds
 e. Overlay a file system: mke2fs -j /dev/md0
 f. mount /dev/md0 /raid5
 g. Test I/O to RAID-5 device
 h. Update: /etc/fstab

Thanking You
Hope U Like it.....

Fedora 20 in Virtual box

Roboform in linux

Ubuntu server 12.04

Nagios 4.0.7

Oracle Linux 7
Free BSD 10