Cloud Network

Networking | Support | Tricks | Troubleshoot | Tips

Buymecoffe

Buy Me A Coffee

Wednesday, November 6, 2019

How to Install Docker Engine - Community (EC) on CentOS 7,8

November 06, 2019
How to Install Docker Engine - Community (EC) on CentOS 7,8

How to Install Docker Engine - Community (EC) on CentOS 7,8 with Latest Version

Uninstall old versions 
Step1 :- sudo yum remove docker \
                  docker-client \
                  docker-client-latest \
                  docker-common \
                  docker-latest \
                  docker-latest-logrotate \
                  docker-logrotate \
                  docker-engine
or
sudo yum remove docker-ce
sudo rm -rf /var/lib/docker

Install docker ce
Step2 :- sudo dnf install docker-ce-3:18.09.1-3.el7

DNS resolution
Step3 :- sudo systemctl disable firewalld

Start and enable docker daemon
Step4 :- sudo systemctl enable --now docker
or 
sudo systemctl start docker

Verify that Docker EC is installed
Step5 :- sudo docker run hello-world

Adding user to docker group
Step5 :-  sudo usermod -aG docker $USER

Log out and again log in back

Now install the containerd.io package
If you cannot use Docker’s repository to install Docker, you can download the .rpm file for your release and install it manually. You need to download a new file each time you want to upgrade Docker Engine - Community.

Install latest version of docker ce
Step7 :- sudo dnf install docker-ce

How to Install AMD and Nvidia Drivers on Windows 10

November 06, 2019
How to Install AMD and Nvidia Drivers on Windows 10

How to Install AMD and Nvidia Drivers on Windows 10


Step1 :-
1. Graphic Video Card whether AMD and Nvidia should be insert correctly into PCI-E Slot
2. Power cables connectivity

Step2 :- HDMI, Display-Port or USB-C Cable is connected to monitor properly which not connected to wrong port

Step3 :- Remove completely previous or current drivers to your video card
Control Panel --> Uninstall Programs --> check AMD or Nvidia drivers uninstall after that restart system
or
Open AMD and Nvidia Drivers Software go to support then uninstall it

Step4 :- To install AMD Drivers
Click on Website Download : https://www.amd.com/en/support
search with your model number then download
or
Auto-Detect and Install Radeon™ Graphics Drivers for Windows

Step5 :- To install Nvidia Drivers
Click on Website Download : https://www.nvidia.com/Download/index.aspx?lang=en-us
search with your model number then download
or
Auto-Detect and Install Nvidia Graphics Drivers for Windows
https://www.nvidia.com/en-us/geforce/geforce-experience/?cjevent=cf7ac3cd007111ea838000a20a18050d


Tuesday, November 5, 2019

How to Install Java JDK v13.0.1 on Ubuntu 19.10

November 05, 2019
How to Install Java JDK v13.0.1 on Ubuntu 19.10

Website :- https://www.oracle.com/technetwork/java/javase/downloads/jdk13-downloads-5672538.html

Step1 :-  Download the file and show in below screen shot
              Then Extract the .tar.gz file 

After extract there will be a folder name JDK-13.0.1 need to move into /opt directory
Step2 :- sudo mv jdk-13.0.1  /opt/

Set Variables JAVA_HOME and PATH in Ubuntu profile
Step3 :- sudo tee /etc/profile.d/jdk13.0.1env.sh <<EOF  (copy and past one by one into terminal)
export JAVA_HOME=/opt/jdk-13.0.1
export PATH=\$PATH\$JAVA_HOME/bin
EOF

Step4 :- source /etc/profile.d/jdk13.0.1env.sh

Now validate and executed
Step5 :- echo $JAVA_HOME 
         echo $PATH

For Verify which version im using
Step6 :- java -version


Friday, November 1, 2019

How to Make Google Chrome Browser Faster in Windows 10

November 01, 2019
How to Make Google Chrome Browser Faster in Windows 10

Step1 :- Closing Multiple Tabs 
The above image is showing that having multiple tabs open at once. so this is probably utilize ram usage. closing these multiple tabs will free up memory usage.

Step2 :- Delete Unknown Chrome Extension
First click on 3 lines right side of top or three-dot icon in the top-right ---> click on more tools ---> then click on extensions --> select unknown extension click on remove it
or copy and paste ( chrome://extensions/ ) 


Step3 :- Update 
old version using chrome get slow and hanging problem updating to latest verison will solve it
or copy and paste ( chrome://settings/help  )


Step4 :- prefetch feature
basically prefetch will make web pages to load faster than any other browsers. To do this simple 
First click on settings ---> Advanced ---> Privacy and Security ---> then enable if already enable ignore it "Preload pages for faster browsing and searching"
or copy and paste ( chrome://settings )


Step5 :- Software Removal tool
To remove any malware or potentially unwanted program that could be causing chrome to run slowly
copy and paste ( chrome://settings ) then click on Advanced ---> Reset and clean up ---> click on clean up 


Step6 :- Clear the browsing data or history and reset 

Thursday, October 31, 2019

How to Install and Create Ubuntu 19.10 LTS Using Hyper-V on Windows 10

October 31, 2019
How to Install and Create Ubuntu 19.10 LTS Using Hyper-V on Windows 10

Specification Required :-

  1. Windows 10 Pro or Enterprise license  - 64bit
  2. BIOS should support virtualization
  3. Version 1803/v1809 or v1903

To verify Windows OS and Version type
Press: win + r (keyboard)
Type : winver

To Verify BIOS Hardware type
Type : systeminfo (cmd or command prompt)

Open Hyper-V by typing
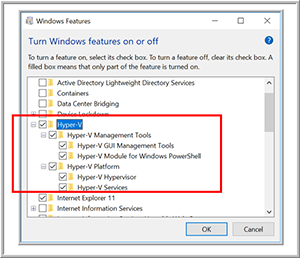
copy : optionalfeatures (start Menu or win + r)


Now Select Hyper-V see below screenshot


  • After the Hyper-V features had installed, I rebooted my system.
  • open Hyper-V quick create by typing on Start menu
  • Select Windows 10 or Ubuntu then click on create virutal machine
  • After Successfully created VM then selected "Edit settings to see how the VM configured
  • Then Click on cancel and connect and start it
  • Assign Login details like username and password


Download MS Hyper-V Server 2019

October 31, 2019
Download MS Hyper-V Server 2019

How to Switching Hyper-V Virtualization Off and On

October 31, 2019
How to Switching Hyper-V Virtualization Off and On

How to Switching Hyper-V Virtualization Off and On

Type command in your Start Menu search bar and select Run as Administrator. Then input the following command:

bcdedit /set hypervisorlaunchtype off

Then restart your system.

Hyper-V virtualization will not start after the reboot, and you should find your performance returns to normal. If you want to turn Hyper-V virtualization on again, use the following command:

bcdedit /set hypervisorlaunchtype on

Restart your system again.