September 2014 - Cloud Network

Networking | Support | Tricks | Troubleshoot | Tips

Buymecoffe

Buy Me A Coffee

Tuesday, September 30, 2014

How to Install FreeBSD 10 on Virtual Box

September 30, 2014
How to Install FreeBSD 10 on Virtual Box
Free BSD 10 
Hello Everyone,

How to install FreeBSD 10 (Latest Version) on Virtual Box.

Step1:- First Download Virtual box setup below is this link to download
https://www.virtualbox.org/wiki/Download...

select -- VirtualBox 4.3.16 for Windows hosts

Step2:- See My Video How to Install Virtual Box...
http://www.youtube.com/watch?v=__l_lhcwxwk&list=PLmMAzSMza_1fdrc0r94-l_cBuvs9L0-qq

Step3:- Download ISO Image of FreeBSD 10
https://www.freebsd.org/where.html

Step4:- select amd64 bit ISO image Download
if you want to download for 32 bit then you can download i386


For remaining Installation please Keep watching my video

PLEASE REMEMBER USERNAME & PASSWORD During Insallation.

If you Forget username or password or then you can reset by watching below video.....

How to Reset Root Password
https://www.youtube.com/watch?v=oikxj...


NOTE :- For Any Clarification Please Comment Below


Thanking you
Hope U Like it.....

Oracle Linux 7

Fedora 20 in Virtual box

Nagios 4.0.7

Roboform in linux

Ubuntu server 12.04
Zimbra Desktop 7

Monday, September 29, 2014

What is DHCP and How to Configure it

September 29, 2014
What is DHCP and How to Configure it
Dynamic Host Configuration Protocol(DHCP)

The Dynamic Host Configuration Protocol(DHCP) is a standardized networking protocol used on Internet Protocol networks for dynamically distributing Ip Address automatic to Client or Host Systems. It will be Renew(Change) the Ip Address after 7 Days or 1 Week.

###Dynamic Host Configuration Protocol Daemon###
Features:
 1. Provides automatic configuration of IPv4 clients
  a. IPv4 address
  b. Subnet mask
  c. Default gateway
  d. DNS Servers
  e. NTP Servers
  f. WINS Servers

 2. Leases the addreses and related information based on predefined values:
  a. 1 day
  b. 1 week
  c. 1 month

 3. DHCP uses UDP protocol and layer-2 information to request/assign addresses

 4. DHCP Process - DORA
  a. Discovery - client broadcasts on the local subnet for a DHCP server
  b. Offer - returned by the DHCP server
  c. Request - formal address request by client
  d. Acknowledgement/Acceptance - Acknowledgement occurrs

Note: DHCPD records leases in: /var/lib/dhcpd/dhcpd.leases

Tasks:
 1. Install DHCP server
  a. yum -y install dhcp

 2. Configure: /etc/dhcpd.conf - primary config file

 3. Set service up to start when system boots
  a. chkconfig dhcpd on - 2345

 4. Disable service on 192.168.75.100 box
  a. rcdhcpd stop

 5. Start service on localhost:
  a. service dhcpd start

 6. Setup DHCP reservation
  a. Requires the MAC address of the client (00:0C:29:B5:16:92)
  b. Requires the 'fixed-address' - IPv4 address to map to the MAC address
  c. Optional 'option-*' are supported between host { } block
  d. service dhcpd restart - restart to effect changes

/etc/dhcpd.conf

Port Numbers
67 Bootp
68 DHCP

/usr/share/doc/dhcp-<version-number>/dhcpd.conf.sample

subnet 192.168.1.0 netmask 255.255.255.0 {
   # The range of IP addresses the server
   # will issue to DHCP enabled PC clients
   # booting up on the network

 range 192.168.1.201 192.168.1.220;
   # Set the amount of time in seconds that
   # a client may keep the IP address

 default-lease-time 86400;
 max-lease-time 86400;
   # Set the default gateway to be used by
   # the PC clients

 option routers 192.168.1.1;
   # Don't forward DHCP requests from this
   # NIC interface to any other NIC
   # interfaces

 option ip-forwarding off;
   # Set the broadcast address and subnet mask
   # to be used by the DHCP clients

 option broadcast-address 192.168.1.255;
 option subnet-mask 255.255.255.0;
   # Set the DNS server to be used by the
   # DHCP clients
   option domain-name-servers 192.168.1.100;
   # Set the NTP server to be used by the
   # DHCP clients

 option nntp-server 192.168.1.100;
   # If you specify a WINS server for your Windows clients,
   # you need to include the following option in the dhcpd.conf file:

 option netbios-name-servers 192.168.1.100;
   # You can also assign specific IP addresses based on the clients'
   # ethernet MAC address as follows (Host's name is "laser-printer":
   host laser-printer {
      hardware ethernet 08:00:2b:4c:59:23;
      fixed-address 192.168.1.222;
   }
}


Thanking You
Hope U Like it.......

Fedora 20 in Virtual box

Roboform in linux

Ubuntu server 12.04

Nagios 4.0.7

Oracle Linux 7

IPaddress Shortcut Command for Windows 7

September 29, 2014
IPaddress Shortcut Command for Windows 7
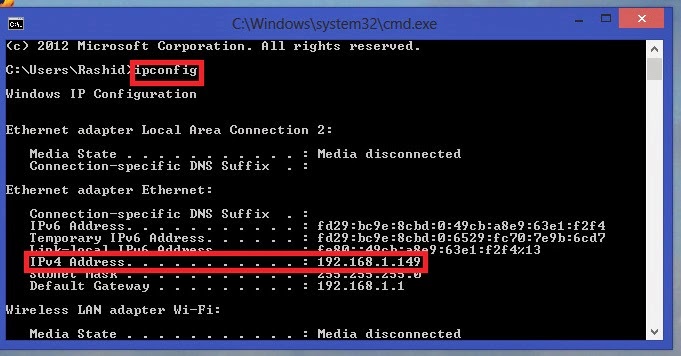
To know about Your System Ipaddress ....
Just Press W+R shortcut from keyboard or follow below images
    type cmd press enter

and then type ipconfig or ipconfig /allcompartments /all   then press enter ....


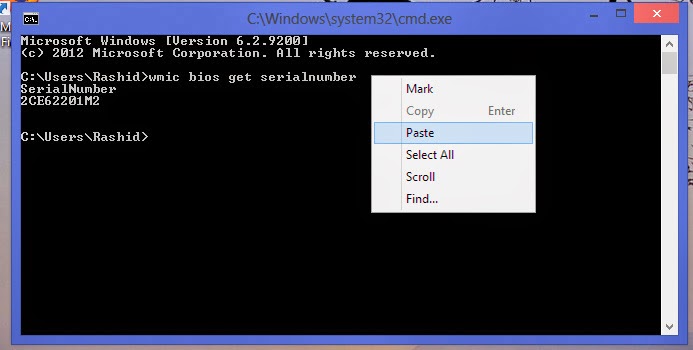
To Get Serial Number in Window System
open command prompt and type or copy paste by right click on mouse

wmic bios get serialnumber


To Get Completely Hardware, Components & Software Information inWindows
press in keyboard (Windows+R) & type
MSINFO32  press Enter

To know about System Motherboard Model Number
press W+R then type cmd enter then type systeminfo press enter scroll down you will find System Model

To Get System
Alt+f BIOS RESET
Alt+e NVRAM RESET


Thanking You
Hope U Like it.......

Ubuntu 14.04

Linux Mint 17

Ubuntu Root Password Reset

Lamp in Ubuntu 14.04

Redhat Linux 7 server
Gentoo Linux 12.1

Wednesday, September 24, 2014

How to Install Gentoo Linux 12.1 LiveDVD on Oracle Virtual Box

September 24, 2014
How to Install Gentoo Linux 12.1 LiveDVD on Oracle Virtual Box
Gentoo Linux 12.1 Live DVD

Hello Everyone,

How to install Gentoo Linux 12.1 (Latest Version) on Virtual Box.

Step1:- First Download Virtual box setup below is this link to download
https://www.virtualbox.org/wiki/Downloads

select -- VirtualBox  4.3.16  for Windows hosts

Step2:- See My Video How to Install Virtual Box...
 http://www.youtube.com/watch?v=__l_lhcwxwk&list=PLmMAzSMza_1fdrc0r94-l_cBuvs9L0-qq

Step3:- Download ISO Image of Gentoo Linux 12.1
 https://www.gentoo.org/news/20120401-livedvd.xml
or
http://ftp.snt.utwente.nl/pub/os/linux/gentoo/releases/amd64/12.1/

For remaining installation please Keep watching my video

PLEASE REMEMBER USERNAME & PASSWORD During Insallation of Fedora 20

if you Forget username or password or then you can reset by watching below video.....

How to Reset Root Password
https://www.youtube.com/watch?v=oikxj...


NOTE :- For Any Clarification Please Comment Below


Thanking you
Hope U Like it.....

Reset Root Password in linux

Linux Mint 17

pendrive bootable for ubuntu

Nagios 4.0.7

Oracle Linux 7
Fedora 20

Thursday, September 18, 2014

How to Install & Configure Zimbra Desktop 7.2.5 in Windows 7

September 18, 2014
How to Install & Configure Zimbra Desktop 7.2.5 in Windows 7
Install & Configure Zimbra Desktop 7.2.5


Hello Everyone,

In this tutorial, Let us Install & Configure Zimbra 7.2.5 Desktop on
Window 7.

You Can Install Zimbra in
Operating System :- Windows 8, Windows 7 and Windows Vista.
Processor :- 32 Bit and 64 Bit both Can Support

Requirement :-
Step1 :- At least 200MB free disk space is required to
install the software.

Step2 :- Additional 512MB free memory is required to run
Zimbra Desktop

You Can Download Zimbra Desktop 7.2.5 :-
Step3 :- http://www.zimbra.com/downloads/zimbr...

After Installation Need to Configure in GMAIL
Login into Gmail Account and Set the IMAP Enable
Step4 :- Enable IMAP in Setting

Step5 :- Then Click On Google Plus - Go to Security then Enable the Access to Low, Save and Exit


NOTE :- For Any Clarification Please Comment Below

Watch Next Video :- How to install Ubuntu 14.04

https://www.youtube.com/watch?
v=QkJmahizwO4&list=TLFuFUUOL3YmsshiR­7O5nLXmuJZMr
OsuZd


Thanking You
Hope U Like it........

Windows Server 2008

Orientdb NoSQL part2

Python 3.4.1

Install OrientDB Document Graph

Netbeans IDE
Vtiger CRM Database

Monday, September 15, 2014

How to install Fedora 20 on Virtual Box

September 15, 2014
How to install Fedora 20 on Virtual Box
Install Fedora 20 in Virtual Box
Hello Everyone,

How to Install Fedora 20 (Latest Version) on Virtual Box.

Step1:- First Download Virtual box setup below is this link to download
https://www.virtualbox.org/wiki/Downloads

select -- VirtualBox 4.3.12 for Windows hosts 32 bit.

Step2:- See My Video How to Install Virtual Box...
http://www.youtube.com/watch?v=__l_lhcwxwk&list=TLmAZSxgVjfkOZs3nwQ9awKvuY7sIlHzfu

Step3:- Download ISO Image of Fedora 20 ..
http://fedoraproject.org/get-fedora
size - 935MB.

For remaining installation please Keep watching my video

PLEASE REMEMBER USERNAME & PASSWORD During Insallation of Fedora 20

if you Forget username or password or then you can reset by watching below video.....

How to Reset Root Password --- https://www.youtube.com/watch?v=oikxjjYH7rI&list=PLmMAzSMza_1f4b8Keim51-9LfKBU28pWf


NOTE :- For Any Clarification Please Comment Below

Watch Next Video :- see How to Install Ubuntu Desktop 14.04 LTS

https://www.youtube.com/watch?v=PiKchOXHwpE&list=PLmMAzSMza_1f4b8Keim51-9LfKBU28pWf


Thanking you
Hope U Like it.....


<h1 style="display:none">Ubuntu 14.04</h1>
<h2 style="display:none">Linux Mint 17</h2>
<h3 style="display:none">Python</h3>
<h4 style="display:none">Nagios</h4>
<h5 style="display:none">Oracle Linux 7</h5>

Own Website

Vtiger Open Source Database

Install Vtiger CRM

Tortoise installation SVN

Notepad++ install
Ubuntu Server 12.04

Wednesday, September 10, 2014

How to install Oracle Linux 7 on Virtual Box

September 10, 2014
How to install Oracle Linux 7 on Virtual Box

Hello Everyone,

In this tutorial,

Let us Install Oracle Linux 7 in Virtual Box with Full Screen Resolution  --  64 Bit

You Can also Install in VMware Workstation 11 or Microsoft Hyper-V.

Minimum System Requirements
1.  x86-64 CPU (64-bit Macs, with an Intel Core 2 Duo, Intel Core i3, Intel Core i5, Intel Core i7, or Xeon processor).
2GB of System Memory (RAM).
3. 20GB of Disk Space(Hard Disk).
4. Graphics Card and Display capable of at least 1024x768.
5. Either a CD/DVD drive or a USB port for the installer media.
6. Internet Access.

Step1:- First Download Virtual box setup below is this link to download 
Or
Another Link to Download Virtual Box

Select -- Virtual Box 4.3.X for Windows hosts 32 or 64 bit.   
(Where 'X' is the Latest Version)

Step2:- See My Video How to Install virtual box... Click Below link

Step 3 :- Download ISO Images of Oracle Linux 7 by Clicking Below Link

Step 4 :- Just Check the Box of  (Accept License Agreement)
and then Click on --- OracleLinux-R7-U0-Server-x86_64-dvd.iso (3,826,253,824 bytes)  --- Download.

You Need to Create a New Account After Regsiter you Can Download it

Follow Instruction in My Video to See How to Install

For Full Screen Resolution….
Step4 :- sudo apt-get install virtualbox-guest-dkms virtualbox-guest-utils virtualbox-guest-x11                or
Step5 :- sudo apt-get install virtualbox-guest-dkms
Restart the VM and enjoy screen-size.

Mount the Guest Additions by selecting Devices --- Insert Guest Additions CD image… (or you can press Host + D)
Step6 :- run the VBoxLinuxAdditions.run script within the newly mounted cd
              or  sh VBoxLinuxAdditions.sh

NOTE :- For Any Clarification Please Below

Comment,
Like and
Share  us  and  help us to spread.

####--------------------------------------------------------------------------------------####
Website    :-   http://www.cloudnetwork.in
Twitter     :-   http://twitter.com/itcloudnet
Skype Id  :-   cloud.network1
E-Mail Id :-   itcloudnet@gmail.com
####----------------------------------------------------------------------------------------####                         
Thanking You
Hope U Like it........

Friday, September 5, 2014

How Many Port Numbers are there in Linux and Ubuntu

September 05, 2014
How Many Port Numbers are there in Linux and Ubuntu
Port Numbers
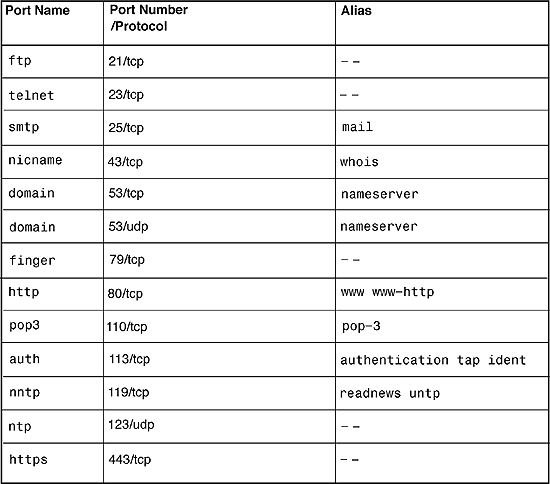
Every computer or device on the Internet must have a unique number assigned to it called the IP address. This IP address is used to recognize your particular computer out of the millions of other computers connected to the Internet. When information is sent over the Internet to your computer how does your computer accept that information? It accepts that information by using TCP or UDP ports.


21 => FTP
22 => SSH
23 => Telnet
25 => SMTP Mail Transfer
43 => WHO IS Service
53 => name server (DNS)
80 => HTTP (Web server)
110 => POP protocol pop3 (for email)
995 => POP over SSL
3306 => MySQL Server
111 => rpcbind
953 => rndc
143 => IMAP Protocol (for email)
993 => IMAP Secure
443 => HTTP Secure
3128 => Squid Proxy
3306 => MysQL Server
3636 => Piranha
4643 => Virtuosso Power Panel
10000 => Webmin


Thanking You
Hope U Like it......


Ubuntu 14.04

Lamp Installation in Ubuntu

Root Password Reset in Ubuntu

Linux Mint 17

Own Blogger Website
Install Free BSD

What is POSTFIX and How it Works in Linux Server

September 05, 2014
What is POSTFIX and How it Works in Linux Server
PostFix Mail
###Squid Proxy Server###
 Features:
  1. Caching server
  2. Filters access to the Net
  3. Efficient bandwidth usage
  4. Supports a wide criteria of ACLs (dstdomain, src_IP, Time of day, etc.)

Tasks:
 1. Install Squid Proxy server
  a. yum -y install squid

/etc/squid - primary configuration container
/etc/squid/squid.conf - primary configuration file
/usr/sbin/squidclient - used to test Squid Proxy server
/var/log/squid - primary log directory
/var/spool/squid - cache directory containter

 2. Start Squid, and ensure that it starts when the system reboots
  a. service squid start
  b. chkconfig --level 35 squid on

Note: Ensure that ample/fast disk storage is available for: /var/spool/squid
Note: Squid defaults to TCP:3128

 3. Configure Firefox browser to use Squid Proxy server
 
 4. Configure Squid to allow LAN access through, to resources
  a. nano /etc/squid/squid.conf
  b. acl lan_users src 192.168.75.0/24
  c. http_access allow lan_users

 5. Deny 192.168.75.10, but allow ALL other users from the local subnet
  a.
acl_lan_bad_users src 192.168.75.10
http_access deny acl_lan_bad_users

Thanking You
Hope U Like it...

<h1 style="display:none">Squid Proxy Server</h1>
<h2 style="display:none">Linux Mint 17</h2>
<h3 style="display:none">Python</h3>
<h4 style="display:none">Squid Proxy</h4>
<h5 style="display:none">Oracle Linux 7</h5>

What is Proxy Server and How it works ?

September 05, 2014
What is Proxy Server and How it works ?
Proxy Server

###Squid Proxy Server###
 Features:
  1. Caching server
  2. Filters access to the Net
  3. Efficient bandwidth usage
  4. Supports a wide criteria of ACLs (dstdomain, src_IP, Time of day, etc.)

Tasks:
 1. Install Squid Proxy server
  a. yum -y install squid

/etc/squid - primary configuration container
/etc/squid/squid.conf - primary configuration file
/usr/sbin/squidclient - used to test Squid Proxy server
/var/log/squid - primary log directory
/var/spool/squid - cache directory containter

 2. Start Squid, and ensure that it starts when the system reboots
  a. service squid start
  b. chkconfig --level 35 squid on

Note: Ensure that ample/fast disk storage is available for: /var/spool/squid
Note: Squid defaults to TCP:3128 

 3. Configure Firefox browser to use Squid Proxy server
 
 4. Configure Squid to allow LAN access through, to resources
  a. nano /etc/squid/squid.conf
  b. acl lan_users src 192.168.75.0/24
  c. http_access allow lan_users

 5. Deny 192.168.75.10, but allow ALL other users from the local subnet
  a. 
acl_lan_bad_users src 192.168.75.10
http_access deny acl_lan_bad_users

Thanking You
Hope U Like it.......

Ubuntu 14.04

Linux Mint 17

Python

Nagios

Oracle Linux 7
Reset Root Password

How to Create RAID in Linux

September 05, 2014
How to Create RAID in Linux
RAID
###RAID###
Features:
 1. The ability to increase availability and reliability of data
      (originally redundant array of inexpensive disks; now commonly redundant array of independent disks)
Tasks:
 1. Create a RAID-1 Device (/dev/md0..n)
  a. fdisk /dev/sdb - to create usable raw partitions
  b. partprobe /dev/sdb - to force a kernel update of the partition layout of the      disk: /dev/sdb
  b. mdadm --create /dev/md0 --level=1 --raid-devices=2 /dev/sdb5 /dev/sdb6
  c. cat /proc/mdstat - lists active RAID (md) information
  d. mke2fs -j /dev/md0 - overlays a file system on the RAID device
  e. mount /dev/md0 /raid1
  f. update: /etc/fstab

Note: use 'mdadm --query /dev/md0' to get information about a RAID device

Note: You may create RAID volumes/devices on a single or on multiple disks
Ideally, your RAID volumes should span multiple physical disks to improve:
 a. reliability
 b. performance
 c. availability

 2. Remove the RAID-1 device
 a. umount /dev/md0
 b. mdadm --manage --stop /dev/md0

 3. Create a RAID-5 Volume
 a. fdisk /dev/sdb - to create a partition number 7
 b. partprobe /dev/sdb - to update the kernel's view of the partition table
 c. mdadm --create /dev/md0 --level=5 --raid-devices=3 /dev/sdb5 /dev/sdb6 /dev/sdb7
 d. watch cat /proc/mdstat - refreshes every 2 seconds
 e. Overlay a file system: mke2fs -j /dev/md0
 f. mount /dev/md0 /raid5
 g. Test I/O to RAID-5 device
 h. Update: /etc/fstab

Thanking You
Hope U Like it.....
Fedora 20 in Virtual box

Roboform in linux

Ubuntu server 12.04

Nagios 4.0.7

Oracle Linux 7
Free BSD 10

Wednesday, September 3, 2014

How to Install Repository through RPM & YUM Packages in Redhat Linux 6 Server

September 03, 2014
How to Install Repository through RPM & YUM Packages in Redhat Linux 6 Server
RPM & YUM
1. If its local repository then
Install Package createrepo ( this pacakge is present in RHEL 5 dvd in Server folder)

RPM -ivh createrepo

createrepo -v /var/ftp/pub/Server

/var/ftp/pub/Server => this is the directory where local copy of RPM packages are there

Edit the Server.repo file

# vi Server.repo
[Server]
name= redhat
baseurl=file:///var/ftp/pub/Server
[enable=1]
[gpgcheck=0]
Save the file and quit
Then,

#yum clean all
#yum update

Now you can install packages
#yum install package-name

2. If repository is present in server
-----------------------------------------------------------------------------------------------
#cd /etc/yum.repos.d
#ls
Then it will list the files. There is a file with name rhel-debuginfo.repo. Copy this file to a temp file with name Sever.repo. The starting letter of Server should be Capital.
Second step is given below

#cp rhel-debuginfo.repo Server.repo

The Third and final steps
Edit the Server.repo file

# vi Server.repo
[Server]
[name= redhat]
[baseurl=ftp://192.168.0.254/pub/Server] ( eg: IP address : 192.168.0.254 (the server IP)
[enable=1]
[gpgcheck=0]
Save the file and quit
Then,

#yum clean all
#yum update

Now you can install packages
#yum install package-name


Thanking You
Hope U Like it....

Ubuntu 14.04

Linux Mint 17

Ubuntu Root Password Reset

Lamp in Ubuntu 14.04

Redhat Linux 7 server
Gentoo Linux 12.1

How Many Types of RunLevel (INIT)

September 03, 2014
How Many Types of RunLevel (INIT)
Run Level(INIT)
 To check the run level we need to see the file /etc/inittab

#vi /etc/inittab
defaults run level used by RHS are

0    :    hault ( do not set init default to this)
1    :    single user mode
2    :    multi user mode without networking
3    :    multi-user mode with networking
4    :    unused
5    :    X11 (Graphical)
6    :    reboot

#runlevel    :    this command shows that in which run level you are at present

in init 3 runlevel, if you type command startx to go to the graphical mode then it will not ask you for password.

By default we have 6 virtual console (text mode), but we van increase or decrease the number of text mode simply by editing the file /etc/inittab

#vi /etc/inittab
line No 18    :    id:5:initdefault


Thanking You
Hope U Like it....


Fedora 20 in Virtual box

Roboform in linux

Ubuntu server 12.04

Nagios 4.0.7

Oracle Linux 7
Free BSD 10

What is Samba & How it Can Share File and Printer in Linux or Windows

September 03, 2014
What is Samba & How it Can Share File and Printer in Linux or Windows
Samba Sharing
What is Samba ?
Samba can be used to share file and printer between Linux to Linux, Linux to Ubuntu and Linux to Windows.
Daemon  :        smbd, nmbd
Port        :        167,168,169

Features:
 1. Provides Windows features (file & print) on Linux | Unix

/etc/samba/smb.conf - primary config file

Clients:
 1. findsmb - finds SMB hosts on the network
 2. smbtree - equivalent to Network Neighborhood/My Network Places (prints workgroups, hosts, and shares)
 3. smbget - similar to 'wget', in that, it will download files from the remote share
  a. smbget -u dean smb://linuxcbtwin1/mtemp/20070524_SAN_Allocations.ods

 4. smbclient - interactive (FTP-like_ utility to connect to shares - permits uploads/downloads from shares
  a. smbclient -U dean //linuxcbtwin1/mtemp
  b. mget file* - downloads file(s)
  c. mput file* - uploads file(s)


 5. smbtar - backs-up smb shares to a TAR archive
  a. smbtar -s linuxcbtwin1 -x mtemp -u dean -t backup1.tar

Samba Server:
/etc/samba/smb.conf - primary config file

SWAT manages /etc/samba/smb.conf

Samba Server Modes:
 1. User
  a. One Samba-defined user is required per Linux user
  b. Authentication of users is handled by Samba server
 2. Server/Domain (PDC/BDC)
  a. Authentication is handled by the Windows NT/2K/2K3/2K8 server
  b. Still requires a local Samba-defined user accounts database
 3. ADS - Active Directory
  a. Authentication is handled by Active Directory
  b. When used with Winbind, locally-defined Samba users are NOT required

Note: Ultimately, users must authenticate to the local Linux file system

Task:
 1. Install SWAT
  a. yum -y install samba-swat
  b. nano /etc/xinetd.d/swat - set 'disable = no'
  c. service xinetd restart
  d. netstat -ntl | grep 901


/etc/samba/smbpasswd maps Windows users to /etc/passwd

 2. Install rdesktop and connect to Windows XP to test connectivity to Samba
  a. yum -y install rdesktop

Winbind:
 Features:
  1. Windows AD integration
  2. Avoids having to define users in 2 places: Windows, Linux
  3. Uses Kerberos for authentication

Requirements:
 1. krb5-* packages
 2. Properly configured Kerberos environment:
  a. /etc/krb5.conf

[libdefaults]
    default_realm = AD2.LINUXCBT.INTERNAL

[realms]
    AD2.LINUXCBT.INTERNAL = {
        kdc = linuxcbtwin3.ad2.linuxcbt.internal
        admin_server = linuxcbtwin3
    }

[domain_realm]
    .linuxcbtwin3.ad2.linuxbt.internal = AD2.LINUXCBT.INTERNAL


Steps:
 1. Update: /etc/krb5.conf
 2. Update Samba configuration to use ADS authentication
 3. Update Samba server's DNS to point to ADS server
  a. /etc/resolv.conf
  b. /etc/hosts - including a pointer to the ADS server (linuxcbtwin3)

 4. Join AD domain:
  a. 'net ads join -U administrator'
 5. Confirm AD membership using: 'Active Directory Users & Computers' Tool

 6. Setup Winbind to authenticate using ADS:
  a. /etc/pam.d/system-auth - account & auth settings
  auth sufficient /lib/security/pam_winbind.so - place before 'pam_unix.so'
  account sufficient /lib/security/pam_winbind.so

  b. /etc/nsswitch.conf
   passwd: files winbind
   group: files winbind

  c. Configure 'idmap' 'uid & gid' mappings - 10000 - 20000
   Use SWAT to update idmap settings for 'uid & gid'
Note: If you want ADS users to be able to logon to your Samba-Winbind Linux box using SSH, Telnet, mingetty, etc., change the 'Template Shell' directive to a valid shell. i.e. /bin/bash

  d. Create 'Template homedir' %D (Domain) directory beneath '/home'
   mkdir /home/LINUXGENIUS

 7. Test Winbind Integration using: wbinfo
  a. wbinfo -u - this enumerates users in AD
  b. wbinfo -g - this enumerates groups in AD
  c. ssh into LINUXCBTSERV1 (Winbind) as ADS user


Task1:
 1. Authenticate using ADS, as 'administrator' from Windows box
 2. Create a user named 'linuxcbt' in AD
 3. Create shared directory on the Samba box, and provide access (Share it)


Thanking You
Hope U Like it....

Ubuntu 14.04

Linux Mint 17

Ubuntu Root Password Reset

Lamp in Ubuntu 14.04

Redhat Linux 7 server
Gentoo Linux 12.1

What is SELinux and How to Setup in Linux

September 03, 2014
What is SELinux and How to Setup in Linux
SELinux, Iptables

###SELinux Intro###
 Features:
  1. Restricts access by subjects (users and/or processes) to objects (files)
  2. Provides Mandatory Access Controls (MACs)
  3. MACs extend Discretionary Access Controls (DACs(Standard Linux Permissions))
  4. Stores MAC permissions in extended attributes of file systems
  5. SELinux provides a way to separate: users, processes (subjects), and objects, via labeling, and monitors/controls their interaction
  6. SELinux is integrated into the Linux kernel
  7. Implements sandboxes for subjects and objects
  8. Default RH5 implementation creates sandboxes (domains) for 'targeted' daemons and one sandbox (unconfined_t) for everything else
  9. SELinux is implemented/enabled by RH5, by default
 10. Operates in the following modes:
   a. Permissive - permission is always granted, but denials are logged in: /var/log/messages
   b. Enforcing - strictly enforces 'targeted' policy rules
   c. Disabled - Only DACs are applied
  11. Operating modes can be applied upon startup or while the system is running

SELinux Config files & Tools:
 1. sestatus - displays current SELinux status, including:
  a. policy name 'targeted'
  b. policy version '21'
  c. Operating mode: 'enforcing|permissive|disabled'

 2. /etc/sysconfig/selinux - primary startup|config file for SELinux
 3. /etc/selinux/targeted - top-level container for the 'targeted' policy
 4. setenforce = 0(permissive) 1(enforcing)
 5. '-Z' can be applied to the following tools to obtain SELinux context info:
  a. mv, cp, ls, ps, id
 6. chcon -R -t type file - applies SELinux label to file/directory

Tasks:
 1. Disable SELinux upon boot-up on LINUXCBTSERV4
  a. nano /etc/grub.conf
   a1. Update 'kernel' line to reflect: selinux=0

Note: If files(objects) lose their SELinux context, there are multiple ways to relabel them:
 1. 'touch /.autorelabel && reboot' - init will relable the system according to the 'targeted' policy
 2. 'fixfiles' - use to relabel objects (files) while the system is running

Note: List of daemons protected by the 'targeted' SELinux policy:
 1. apache(httpd)
 2. dchpd
 3. ntpd
 4. named
 5. syslogd
 6. squid
 7. snmpd
 8. portmap
 9. nscd
10. winbind

Note: The 'targeted' policy assigns ALL other subjects and objects to the 'unconfined_t' domain

Note: The default SELinux 'targeted' policy, using MACs, binds subject domains: i.e. 'httpd_t' to object types: i.e. 'httpd_config_t'

Note: SELinux MACs compound Linux DACs


Thanking You
Hope U Like it.......


Reset Root Password in linux

Linux Mint 17

pendrive bootable for ubuntu

Nagios 4.0.7

Oracle Linux 7
Fedora 20

How to Setup SymLinks(Soft & Hard Links) in Redhat Linux Server

September 03, 2014
How to Setup SymLinks(Soft & Hard Links) in Redhat Linux Server
SymLinks in Hard & Soft
###Symlinks###
Features:
 1. Provides shortcuts to files (including directories)
 2. Provides hard links to inode (file system) locations

Soft Links:-
 1. ln -s source_file target
  a. ln -s ./regextest.pl lastscript.pl

Note: Soft links may span multiple file systems/hard drives
Note: Symlink count is NOT increased when using soft links

 2.  ln -s /home/linuxcbt/testRH5/regextest.pl . - this will symlink (soft) to the /boot file system

Note: With soft links, if you change the name or location of the source file, you will break ALL of the symlinks (soft).

Hard Links:-
 Features:
  1. The ability to reference the same inode/hard drive location from multiple   places within the same file system
   a. ln source target
      ln regextest.pl ./testhardregextest.pl - creates a hard link


Thanking You
Hope U Like it....

Oracle Linux 7

Fedora 20 in Virtual box

Nagios 4.0.7

Roboform in linux

Ubuntu server 12.04
Zimbra Desktop 7

How to Install Squirrel Mail(Web mail) Integration with Apache in Linux Server

September 03, 2014
How to Install Squirrel Mail(Web mail) Integration with Apache in Linux Server
Squirrel Web Mail
###Squirrelmail (Web mail) Integration with Apache/Postfix/Dovecot###
Features:
 1. Web mail application
 2. Modular
 3. Implemented with PHP


Tasks:-
 1. Install Squirrelmail with support via Apache

  a.Download from squirrelmail.org - *.bz2

  b. Confirm the MD5SUM

  c. Copy the *.bz2 file to the Apache server

  d. yum -y install php php-imap - installs PHP support for Apache/IMAP

  e. mkdir /var/www/mail

  f. Extract Squirrelmail to: /var/www/mail

  g. Optionally, create symlink named 'mail' to point to Squirremail version

  h. Create the Apache Virtual Host

<VirtualHost 192.168.0.12:80>
    ServerAdmin webmaster@mail.linuxcbt.internal
    ServerName mail.linuxcbt.internal
    DocumentRoot /var/www/mail
    <Directory /var/www/mail>
        Options FollowSymLinks
        Order allow,deny
        Allow from all
    </Directory>
    CustomLog logs/mail.linuxcbt.internal.access.log combined
    ErrorLog logs/mail.linuxcbt.internal.error.log
    </VirtualHost>

  i. Restart Apache

  j. Configure SquirrelMail defaults: /var/www/mail/mail/config/conf.pl

  k. Create 'attach' and 'data' directories for SquirrelMail: /var/local/squirrelmail/{data,attach}

  l. Update permissions so SquirrelMail may write to 'data' and 'attach' directories: chown -R apache.apache /var/local/squirrelmail

  k. Setup DNS

  l. Attempt to access SquirrelMail
http://mail.linuxcbt.internal/mail
http://mail.linuxcbt.internal/mail/src/configtest.php

Note: If SELinux is enabled, use 'setsebool...' to allow httpd to connect to IMAP and SMTP ports. Consult: /var/log/messages


Thanking You
Hope U Like it....

Windows Server 2008

Orientdb NoSQL part2

Python 3.4.1

Install OrientDB Document Graph

Netbeans IDE
Vtiger CRM Database

How to Set Sudo Logging Without Password

September 03, 2014
How to Set Sudo Logging Without Password
sudo logging
How to Remove Sudo Password to Login into Sudo

Open shell and type: 
Step1 :- $ sudo visudo 
Add the following line to the END of the file:

<username> ALL=NOPASSWD: ALL

Replace <username> with your user name (without the <>).

Example:

Ubuntu ALL=NOPASSWD: ALL

save and exit the vi editer

its done now u can run any command from user Ubuntu


Thanking You
Hope U Like it....


Own Website

Vtiger Open Source

Install Vtiger CRM

Tortoise installation SVN

Notepad++ install
Ubuntu Server 12.04

How to Implement SysLogD and RotationLogD in Linux

September 03, 2014
How to Implement SysLogD and RotationLogD in Linux
###SysLogD###
 Features:-
  1. Handles logging
  2. Unix Domain Sockets (/dev/log)
  3. Internet Sockets (UDP:514)
  4. Ability to log to local and remote targets

Implented as 'sysklogd' package

Primary configuration file: /etc/syslog.conf

Standard syslog.conf file contains:-
  1. Rules
        a.facilities -> applications/daemons/network device/etc.
        b. levels -> Importance of message
Range: 0-7
   7 = emergency (less information)
   6 = alert
   5 = critical
   4 = error
   3 = warning
   2 = notice
   1 = info
   0 = debug (more information)

 2. Targets
  a. file - /var/log/messages
  b. tty - /dev/console
  c. remote hosts - @IP_ADDR_of_REMOTE_HOST

'*' = catchall/wildcard to mean any facility or level
'.none' = exclusion rule

'man syslog.conf' to learn about the support facilities.levels

Task:-
 1. Enable UDP logging for remote Cisco gateway (192.168.75.1)
  a. netstat -nul | grep 514 - reveals UDP:514 listener
  b. nano /etc/sysconfig/syslog
        b1. 'SYSLOGD_OPTIONS="-r"'
  c. restart syslog and confirm UDP:514 listener
        c1. confirm using 'netstat -nul | grep 514'
  d. Configure the router using facility 'local0' and level 'info'
  e. configure /etc/syslog.conf to accept 'local0.info'
  f. restart or reload 'syslog

###Log Rotation###
 Features:
  1. Rotation of logs based on criteria
   a. size
   b. age (daily, weekly, monthly)

  2. Compression
  3. Maintain logs for a defined period

/etc/logrotate.conf - primary (global) config file for all logs
 -can be overriden by context-sensitive files. i.e. apache
 run 'man logrotate'

/etc/logrotate.d - directory for logs to be rotated
 -httpd - used to rotate Apache logs

/var/log/httpd/*log {
    missingok
    notifempty
    sharedscripts
    postrotate
        /bin/kill -HUP `cat /var/run/httpd.pid 2>/dev/null` 2> /dev/null || true
    endscript
}

Task: Setup rotation rule for Cisco log
 1. Create entry in: /etc/logrotate.d based on /etc/logrotate.d/syslog

 2. Modified the entry to rotate based on new criteria
 3. Rotated using: 'logrotate /etc/logrotate.conf'
Note: Force using: 'logrotatate -f /etc/logrotate.conf'


Thanking You
Hope U Like it....

Windows Server 2008

Notepad

Python 3.4.1

Nagios 4

Oracle Linux 7
How to Install Linux Mint 17

How to Install Telnet Server in Redhat Linux Server

September 03, 2014
How to Install Telnet Server in Redhat Linux Server
Telnet Server
###Telnet Server###
Features:
 1. Shell interface on remote system
 2. Binds to TCP:23

Caveat:
 1. Clear-text based application (credentials are transmitted in the clear)
 2. By default, 'root' is NOT permitted access via telnet-server - /etc/securetty

Requirements:
 1. xinetd - installed automatically via yum

Install Telnet Server:
 1. yum -y install telnet-server
 2. nano /etc/xinetd.d/telnet - change 'disable = yes' to 'disable = no'
 3. service xinetd restart - effects changes

Tasks:
 1. Connect to both systems from either system using 'telnet' client
  a. telnet 192.168.75.199 - This will allocate a free pseudo-terminal, if the user authenticates successfully

Note: By default, telnet-server reads and dislplays the contents of: /etc/issue

Note: TCP|UDP ports are 16-bit based: 2**16, OR, 0-65535

Note: ptys are assigned sequentially, by default

 2. Enable 'root' login via telnet
  a. mv /etc/securetty /etc/securetty.disabled

Note: whenever possible opt for SSH in place of Telnet Server


Thanking You
Hope U Like it....

Ubuntu 14.04

Linux Mint 17

Python

Nagios

Oracle Linux 7
Reset Root Password

How to Create New Users & Groups in Linux

September 03, 2014
How to Create New Users & Groups in Linux
User Permission

###User Account & Password Management###

There are three type of user account in Red hat Linux .
1.    Super user or Administrative account
2.    Regular user account
3.    service account

1.    Super User created automatically at the time of installation.
2.    Regular user Account:-
a.    Using command line method useradd or adduser command
b.    Graphical method by using Red hat user manager utility
 
# adduser user_name (Recommended : minimum 6 character used  in password)
# passwd user_name

Example:-
#adduser rakesh
#passwd rakesh
 Now open the file /etc/passwd to check the entry of user

#vi /etc/passwd
it contain 7 entry of each user
1.    Username
2.    Password
3.    userid
4.    groupid
5.    blank (User information field ) comment
6.    home directory
7.    login shell

password entry for each user will be stored in /etc/shadow
# vi /etc/shadow

now in order to check the Userid, Group we use /etc/login.def

# vi /etc/login.def
when any user account is created then user will get userid, groupid automatically from /etc/login.def

5th field is used for user information or comment

6th field is used for home directory. When any user is created its default home directory is created inside /home/rakesh

7th field is login shell. Default shell for user is /bin/bash different shells are used
    ksh, sh, csh, tcsh,zsh

shell is an user interface between user and O.S.

linux command shell is a prompt that allow us to interact with our system by executing various command.

In order to check the shell available use /etc/shells
# vi /etc/shells

in order to get the information about the group we need /etc/group
#vi /etc/group
it contain four field
1.    Group name
2.    password
3.    GroupId
4.    Member of group

# finger:this command is used to get the information about the user

Syntax:
    #finger username
    #finger rakesh

#id:this command is used to get userid, groupid of the user

syntax:
    #id username
    #id rakesh

Creating Group:
Syntax:
#groupadd groupname
 #groupadd g gid groupname
Example:
    #groupadd raj

Exercise:
Create a user that should have uid=1000 shell=sh description and home directory as /data
Sol:
    #useradd u 1000 c rakeshpundir s /bin/sh d /data rakesh
    #passwd rakesh

Grpahically
System Setting :-> User & Group
OR

#system-config-user

Every user have two group one is elementary group or primary group and secondary group
    -g    :    Primary Group
    -G    :    Secondary Group

Creating Group
#groupadd g1
#groupadd g2

Steps:
1.    adding group to the user
#usermod g g1 G g2 rakesh
2.    To change id of the user
#usermod u 1001 rakesh
3.    change comment
#usermod c rakeshsingh
4.    change home directory
#usermod d /rakesh-home rakesh –m
5.    change shell
#usermod s /bin/bash rakesh
6.    change user login name
#usermod l newname oldname
#usermod l rajesh rakesh
7.    Change Group name
#groupmod n newname oldname
#groupmod n group1 g1
8.    change Group id
#groupmod g 2005 group1

------------------------------------------------------------------------------------------
###User/Group Management###
--------------------------------------------------------------------------------------
Features:
 1. The ability to control users and groups

Primary tools:
 1. useradd - used to add users and modify group membership
 2. system-config-users

Task:
 1. Create a user named 'student1' using 'useradd'

Note: Default user settings derive from: /etc/login.defs
 a. useradd student1
 b. set password for user 'student1': passwd student1


Default User Accounts DB: /etc/passwd
student1:x:501:501::/home/student1:/bin/bash

username:shadow_reference:uid:gid:Description(GECOS):$HOME:$SHELL
Note: /etc/passwd is a world-readable file
Note: /etc/shadow now stores passwords in encrypted form
Note: /etc/shadow is NOT world-readable

Fields in /etc/shadow:
student1:$1$XSFMv2ru$lfTACjN.XxaxbHA0EkB4U0:13891:0:99999:7:::

1. username:
2. encrypted_password:
3. Days_since_Unix_epoch_password_was_changed (01/01/1970)
4. Days before password may be changed
5. Days after which the password MUST be changed
6. Days before password is to expire that user is warned
7. Days after password expires, that account is disabled
8. Days since Unix epoch, that account is disabled
9. Reserved field (currently unused)

2. Modify user 'student1' to have password expire after 45 days
a. usermod

Groups:
 1. groupadd - adds new group
 2. groups - lists groups on the system: /etc/group
/etc/group - maintains group membership information

Task: Create a 'sales' group and add 'linuxcbt' and 'student1' as members
 1. groupadd sales
 2. usermod -G sales linuxcbt
 3. usermod -G sales student1

Note: 2 types of groups exist:
 1. Primary - used by default for a user's permissions
 2. Supplemental - used to determine effective permissions

Note: use 'id' to determine the group information of user
Note: Create a new shell session to realize new group membership information

userdel/groupdel are used to delete users and groups, respectively

Features:
 1. The ability to restrict/control access to files

Note: 10 bits represent permissions for files (including directories)

Note: use 'ls -l' to examine permissions or GUI application like 'Nautilus'

-rwxrwxr-x 1 linuxcbt linuxcbt  681 Jan 13 11:31 regextest.pl

1st bit = file type. '-' = file, 'd' = directory
2nd - 4th bits = owner's permissions
r = read = 4
w = write = 2
x = execute = 1
- = none = 0

5th - 7th bits = group owner's permissions
r = read = 4
w = write = 2
x = execute = 1
- = none = 0

8th - 10th bits = everyone (world)
r = read = 4
w = write = 2
x = execute = 1
- = none = 0

Task:
1. Manipulate file permissions using 'chmod'
a. chmod -x regextest.pl

-rw-rw-r-- 1 linuxcbt linuxcbt 681 Jan 13 11:31 regextest.pl
rw = 6 or 4+2 for owner
rw = 6 or 4+2 for group owner
r = 4 for everyone else (world)

Octal notation: 664 for file 'regexetest.pl'

chmod 664 regextest.pl - removes execution for ALL users
chmod 775 regextest.pl - enables execution for ALL users


 2. Ensure that 'regextest.pl' is rw by owner and noone else
 a. chmod 600 regextest.pl

Note: File will now be rw by owner (linuxcbt) and 'root'

 3. Ensure that 'regextest.pl' is r by owner and noone else
 a. chmod 400 regextest.pl && ls -l regextest.pl

Note: chmod supports string values, which represent octal values
chmod +/- x file
chmod +/- w file
chmod +/- r file

chmod +/- u+x file - updates owner's execute permissions on the file
chmod +/- o+x file - updates other's execute permissions on the file
chmod +/- g+x file - updates group's execute permissions on the file

chmod a+rwx = chmod 777

chown - permits changing of ownership of files
 a. chown root regextest.pl - changes ownership to 'root'
 b. chown linuxcbt:sales regextest.pl - changes owner and group to 'linuxcbt:sales'

Task:
 Update 'regextest.pl' so that owner and group owner may modify the file

 a. chmod 660 regextest.pl

SETUID:
 Features:
  1. ability to execute file as owner

chmod 4760 regextest.pl - this will ensure that the perl script always executes as the user 'linuxcbt'
-rwsrw---- 1 linuxcbt sales 787 Jan 13 16:08 regextest.pl

's' in the execute position means that the program will execute as that user


SETGID:
 Features:
  1. Ability to enforce permissions to a directory structure

mkdir /sales
chmod 2775 /sales

Create a file in the '/sales' directory as 'linuxcbt'
seq 1000000 > linuxcbt.1million.txt


chgrp:
 Permits updating of group permissions


Sticky Bit:
 Features:
  1. Ability to ensure that users cannot delete others' files in a directory

drwxrwxrwt 23 root root 4096 Jan 13 15:05 /tmp/


/tmp - users cannot delete other user's files in '/tmp'

chmod 3777 /sales - ensures that /sales will not lose files from incorrect users

Task:
 1. Set '/sales' using sticky bit and test
  a. chmod 3777 /sales && ls -ld /sales OR chmod 777 /sales && chmod +t /sales


Thanking You
Hope U Like it......

Ubuntu 14.04

Linux Mint 17

Python

Nagios

Oracle Linux 7
Reset Root Password

How to Install Roboform in Linux or Ubuntu 14.04

September 03, 2014
How to Install Roboform in Linux or Ubuntu 14.04
Watch Video How to Install Roboform in Linux

Hello Everyone,

Let me show you, How to Install Roboform in Linux and Use of it

To Install Roboform, First Download the Roboform by Click Below Link to Install Roboform Both in Linux and Ubuntu Platform Supported.

http://www.roboform.com/platforms/linux

After Download Just Click Install Now and then Restart Firefox to have complete install.

watch my video to understand

Note:- For any Clarification Please Command Below


Thanking You
Hope U Like it........


Fedora 20 in Virtual box

Roboform in linux

Ubuntu server 12.04

Nagios 4.0.7

Oracle Linux 7
Free BSD 10

Tuesday, September 2, 2014

What is VNC and Installations, Configuration in Linux

September 02, 2014
What is VNC and Installations, Configuration in Linux

What is VNC? 
VNC stands for Virtual Network Computing. It is, in essence, a remote display system which allows you to view a computing 'desktop' environment not only on the machine where it is running, but from anywhere on the Internet and from a wide variety of machine architectures.
  1. The VNC system allows you to access the same desktop from a wide variety of platforms.
   2.  For Example, use a VNC viewer running on a PC on our desktop to display our Unix environments, which are running on a large server in the machine room downstairs.

  • Obtaining VNC
  1. VNC is freely available from the official VNC homepage and You Can Download it Below Link. http://www.realvnc.com/download.html
   2.  IF you prefer to use the command line as opposed to a GUI for installation, run the following command from your Linux CLI. When run, this command will download the RPM package to your current working directory. The file is 700k approx:
  •    Code: Copy and paste into terminal
$  wget http&#58;//www.realvnc.com/dist/vnc-3.3.6-2.i386.rpm
  • The Installation
Installing from RPM is straightforward enough, simply run the following command:
  • Code:
 $  rpm vnc-3.3.6-2.i386.rpm -i
Now you have the core VNC files installed on your system. The first time you run VNC server, you be required to set a password. Remember that it is good practice to choose a password that is not in the dictionary, contains a combination of numbers, letters, and other characters.
To start VNC server, at the command prompt type:
  • Code:
 $  vncserver
If you wish to change the VNC password at any time, enter vncpasswd at the command prompt. The VNC password is not integrated with the standard Linux passwords (any thing inside /etc/passwd), so changing the VNC password will leave all other passwords on the system intact. That also applies the other way round; changing the password on a user account will not affect the VNC password.
You will need to edit the configuration script found in $home/.vnc/xstartup. Any standard text file editor such as vim, emacs or pico will suffice.
For Gnome:
Code:
xrdb $HOME/.Xresources
xsetroot -solid grey
xterm -geometry 80x24+10+10 -ls -title "$VNCDESKTOP Desktop" &
twm &
For KDE
Code:
xrdb $HOME/.Xresources
xsetroot -solid grey
xterm -geometry 80x24+10+10 -ls -title "$VNCDESKTOP Desktop" &
twm &
startkde &

  • The key line in the sample file above is the last one, which in this case is set to twm. This controls which window manager you wish VNC to use. 
  • By default, Redhat systems use gnome, but you may be using kde. The twm should only be used if you do not have a window manager setup on your system. 
  • If you are using kde, you should change twm to startkde and if you are using gnome, you should change it to gnome-session.
  • You should also understand how to kill existing desktops, shutting VNC down. 
  • To do this, you should type vncserver -kill :1 at the CLI, where 1 is the desktop you wish to kill off.
  • That's it. VNC should now be successfully setup on your system.
  •  The last piece of information you need is the ports VNC uses. For the VNC viewer, 5901 is used by default, and for java based VNC access, 5801 is used. 
  • You will need to add rules to your firewall to allow traffic into either or both of these port numbers.
Check If VNC is running
You can check at anytime to see if you have a VNC server currently running. 
  • To do so, I recommend that you use netstat a tool designed to give you information about what ports are listening for connections on your machine. 
  • The following output is an example of what you can expect to see from a netstat command. 
The important part of this output is highlighted in bold:
Code:
 &#91;root@server root&#93;# netstat -an | more
Active Internet connections &#40;servers and established&#41;
Proto Recv-Q Send-Q Local Address Foreign Address State
Tcp 0 0 0.0.0.0&#58;22 0.0.0.0&#58;* LISTEN
Tcp 0 0 0.0.0.0&#58;5801 0.0.0.0&#58;* LISTEN
Tcp 0 0 0.0.0.0&#58;5901 0.0.0.0&#58;* LISTEN
&#91;root@server root&#93;#
The 2 lines that have 0.0.0.0:5801 & 0.0.0.0:5901 indicate we have VNC listening for incoming connections on all interfaces (0.0.0.0). If you find that you cannot connect to VNC, I would recommend that you check it is running. If you see that VNC is running from a netstat command, then I would check your firewall is not blocking your connection attempts.
The VNC Viewer
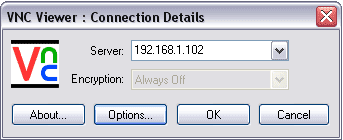
From within you X desktop, you will have access to a VNC viewer, which you may use to remotely control other machines. To access this, open a command terminal, and type in vncviewer. You will be prompted for an IP address to connect to. Enter this, and click ok. You should now have remote control of another PC.
If you have Redhat your firewall in the GUI may always appear to be on, even when its not.
Drop to a command prompt, and run: "iptables -L". If the firewall is really off, then you should see:
Code:
Chain INPUT &#40;policy ACCEPT&#41;
target prot opt source destination

Chain FORWARD &#40;policy ACCEPT&#41;
target prot opt source destination

Chain OUTPUT &#40;policy ACCEPT&#41;
target prot opt source destination
 
When using Winvnc to vnc (linux) remember when connecting with the vnc client to use x.x.x.x:1, where x.x.x.x is the ipaddress. The ":1" is important, as it tells the VNC client the server is listening on tcp/5901 as opposed to 5900 (default on windows).


Thanking You
Hope U Like it......

Ubuntu 14.04

Linux Mint 17

Ubuntu Root Password Reset

Lamp in Ubuntu 14.04

Redhat Linux 7 server
Gentoo Linux 12.1